
Short answer
Before you start
- A Twitch channel with clips made by you or your viewers
- For the second method: OBS Studio 32 or newer, which is what Aitum Vertical's page asks for today
- The free Aitum Vertical plugin, from its official site
- Optional: an overlay that shows your username under your camera
Bring your setup to a 24/7 AI Streamer Coach
Ask Streamer Coach →Get personalized feedback to fix streaming issues and plan your next content.
Step by step
- 01
Open your Twitch clips manager
Nicole Rojas | YouTube | 0:42 ↗You want to post on TikTok or Reels, but editing gives you a headache. Same for all of us. The first method is built into Twitch and costs nothing. Click your profile picture at the top right, open the Creator Dashboard and go to Content, Clips. There are two tabs at the top: clips of your channel and clips you created.
What you should see: You see your channel's clips, each with its landscape thumbnail and a portrait one next to it.
- 02
Open the editor with the scissors
Nicole Rojas | YouTube | 1:00 ↗Pick a clip and click the scissors icon, which is Edit. The clip editor opens with the full clip on the left and the portrait version on the right. Click Edit Layout. These days Twitch suggests an automatic crop that tries to frame your camera and gameplay, and you can accept it, adjust it or dismiss it.
What you should see: The editor shows the portrait version on the right, with the Full and Stacked buttons under it.
- 03
Pick Stacked and frame your camera and gameplay
Nicole Rojas | YouTube | 1:10 ↗Full gives the portrait version a single box. Click Stacked to get two: your camera on top and the game underneath. On the big clip, move and resize each box to choose what shows, and zoom in on what matters, like your face mid-jumpscare. Drag the line in the middle to change how much space each part gets.
What you should see: The portrait version shows your camera on top and the game below, split by a line.
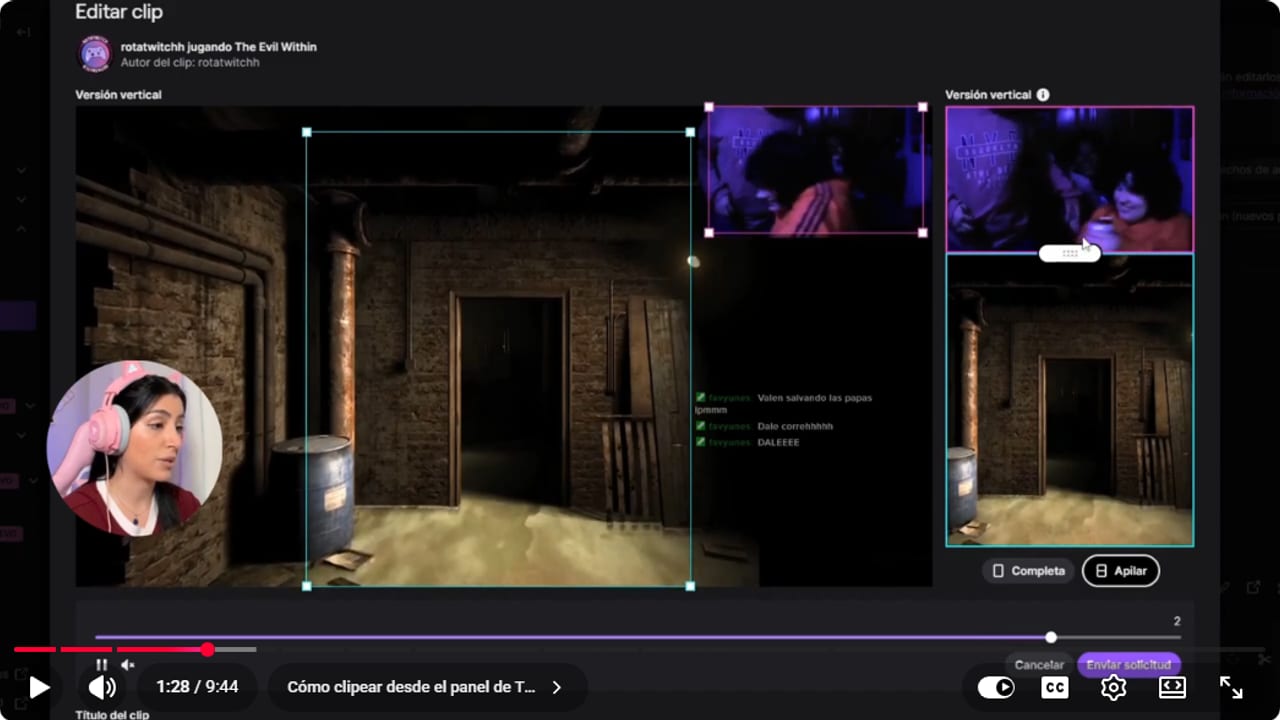
Each box on the big clip becomes one part of the portrait version. Move them and the preview updates on the right. YouTube · 1:29 ↗ - 04
Trim the length and save the clip
Nicole Rojas | YouTube | 1:32 ↗Use the bar at the bottom to cut the clip down to the good part (Twitch clips run up to 60 seconds). Click Save Clip. Twitch warns that it will re-render and overwrite the clip, so confirm and wait for it to process.
What you should see: The clip is back in your list, processed, with its new portrait thumbnail.
- 05
Keep that layout for every future clip
Nicole Rojas | YouTube | 1:50 ↗Here's the best part. Once you edit the portrait layout of one clip, Twitch remembers it and uses it for every new clip of your channel, whether you make it or your viewers do. If you keep the same overlay, your camera always lands in the same spot and there's nothing to fix. Twitch removed the option to add your channel name to clips, so an overlay with your username right under your camera does that job for you.
What you should see: The next clip someone makes of your channel shows up with a stacked portrait version, no editing needed.
- 06
Download it in portrait or post it straight away
Nicole Rojas | YouTube | 2:20 ↗Click Share next to the clip. You'll find a download for the original version, a download for the vertical version, and YouTube, TikTok and Instagram to post directly from Twitch. If the vertical download isn't there, that version hasn't been made yet: edit the layout, save, and give it a minute.
What you should see: Your downloads folder has the clip in portrait format, ready for your phone.
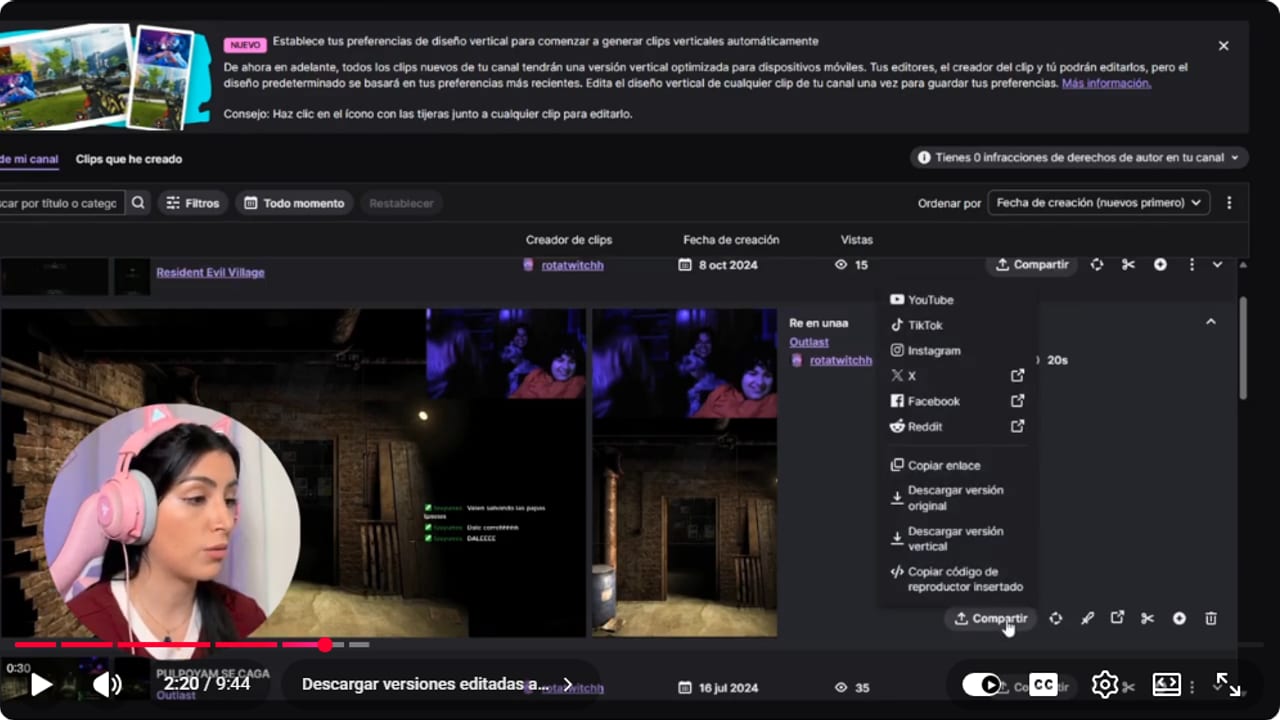
The vertical download gives you a file ready for TikTok or Reels, no editor involved. YouTube · 2:21 ↗ - 07
Add captions without leaving Twitch
Twitch Help: How to Create, Edit, and Share Clips ↗Twitch can now add captions to clips. To turn them on for your channel, go to Creator Dashboard, Settings, Stream, and enable captions in Clip Settings. Clips made with Clip That or Auto Clips already include them. You get 30 days from when a clip is created to fix the text or remove the captions in your Clips Manager, and after that they're locked.
What you should see: In your Clips Manager, new clips show the option to switch their captions on or edit them.
- 08
Download and install Aitum Vertical for free
Nicole Rojas | YouTube | 3:03 ↗The Twitch method has a catch: someone has to make the clip, either you rewatching the whole VOD or your community clipping for you. The second method records while you play. Go to Aitum Vertical's official page on aitum.tv and click the button to download Vertical for free. Ignore the $5.49 a month plan, which is Nexus, a different Aitum product you don't need here. Close OBS, run the installer, click through the steps and open OBS again.
What you should see: When OBS opens, a Vertical dock with a narrow preview appears next to the main one.
- 09
Open the vertical docks in OBS
Nicole Rojas | YouTube | 3:33 ↗In OBS, open the Docks menu. You now have new options for the vertical canvas: the Vertical preview plus vertical Scenes, Sources and Transitions docks. Turn on the Vertical preview first, then the vertical Sources and Scenes docks. Put them wherever suits you. I placed mine side by side.
What you should see: At the bottom you have the vertical Scenes and vertical Sources docks, ready for you to add things.
- 10
Build the vertical scene with your camera and the game
Nicole Rojas | YouTube | 4:04 ↗In the vertical Scenes dock, create a scene and rename it, something like Vertical gameplay. In the vertical Sources dock, click +, choose Video Capture Device and select your camera. Place it at the top, and if something shows that you don't want (I hid a light behind me), crop it by dragging the edge while holding Alt. Then click + again, choose Game Capture, use the one you already have running and frame the part of the game that works for clips.
What you should see: The vertical preview shows your camera on top and the game below.
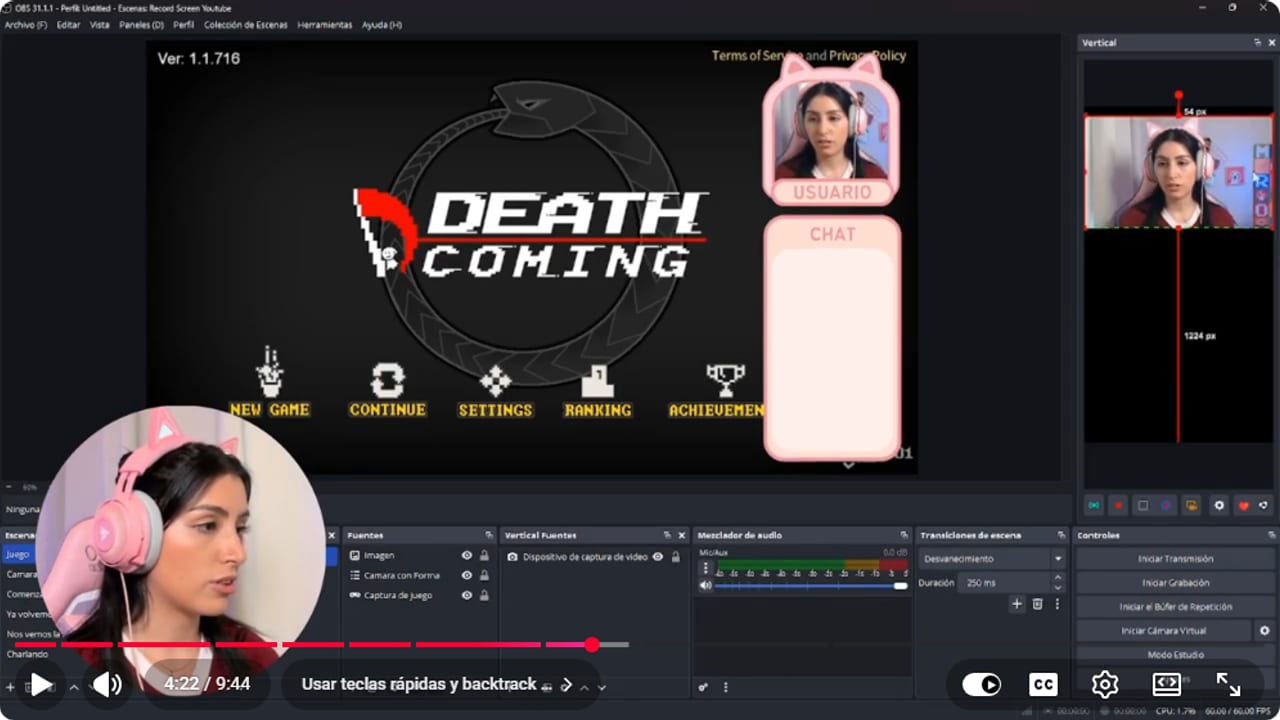
The camera already sits at the top of the vertical canvas. Next, add the game capture underneath. YouTube · 4:23 ↗ - 11
Set up backtrack: 60 seconds, a folder and a hotkey
Nicole Rojas | YouTube | 4:50 ↗Click the gear under the vertical preview to open the vertical settings. Under General, scroll to Backtrack. The recording duration starts at 5 seconds, so raise it to 60 to keep the last minute. For the recording path, click Browse and choose a folder. I made one called clips stream. Then set the save hotkey and, if you like, the hotkeys to start and stop backtrack. Pick keys you can reach while playing but won't hit by accident, like plus, minus or the asterisk, or a Stream Deck button. Click OK.
What you should see: In the vertical settings, the recording duration reads 60 s and the recording path shows your folder.
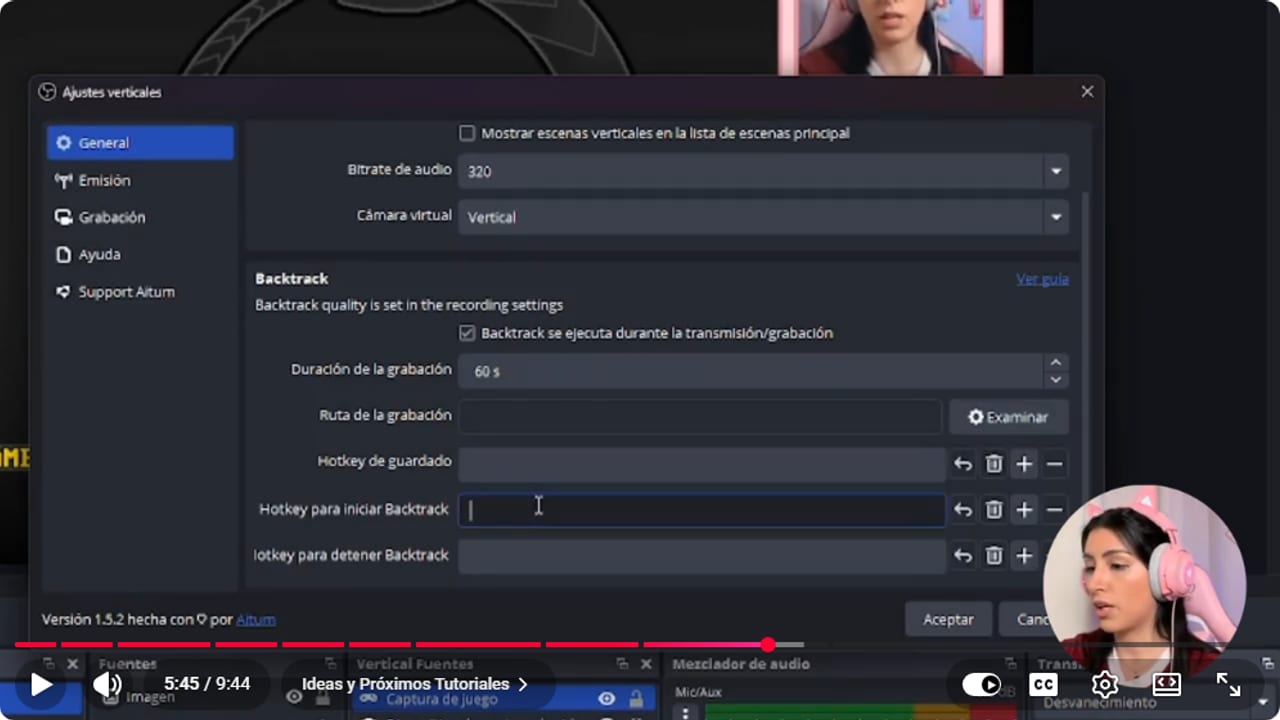
Duration is already at 60 s. You still need to pick a folder with Browse and set the save hotkey. YouTube · 5:46 ↗ - 12
Turn backtrack on and test it before you play for real
Nicole Rojas | YouTube | 6:40 ↗This is where almost everyone trips up. If backtrack isn't switched on, you press the key and nothing records. It happened to me and it's painful. Under the vertical preview, click the backtrack button so it lights up. Check that audio capture is on in the vertical scene too. Play for a bit, press your save hotkey and open the folder. And that's it, vertical clips with zero editing. If you want cuts or styled captions on top, carry on with the guide to editing stream clips in CapCut.
What you should see: Your clips folder has a portrait video with the last minute of gameplay and your camera.
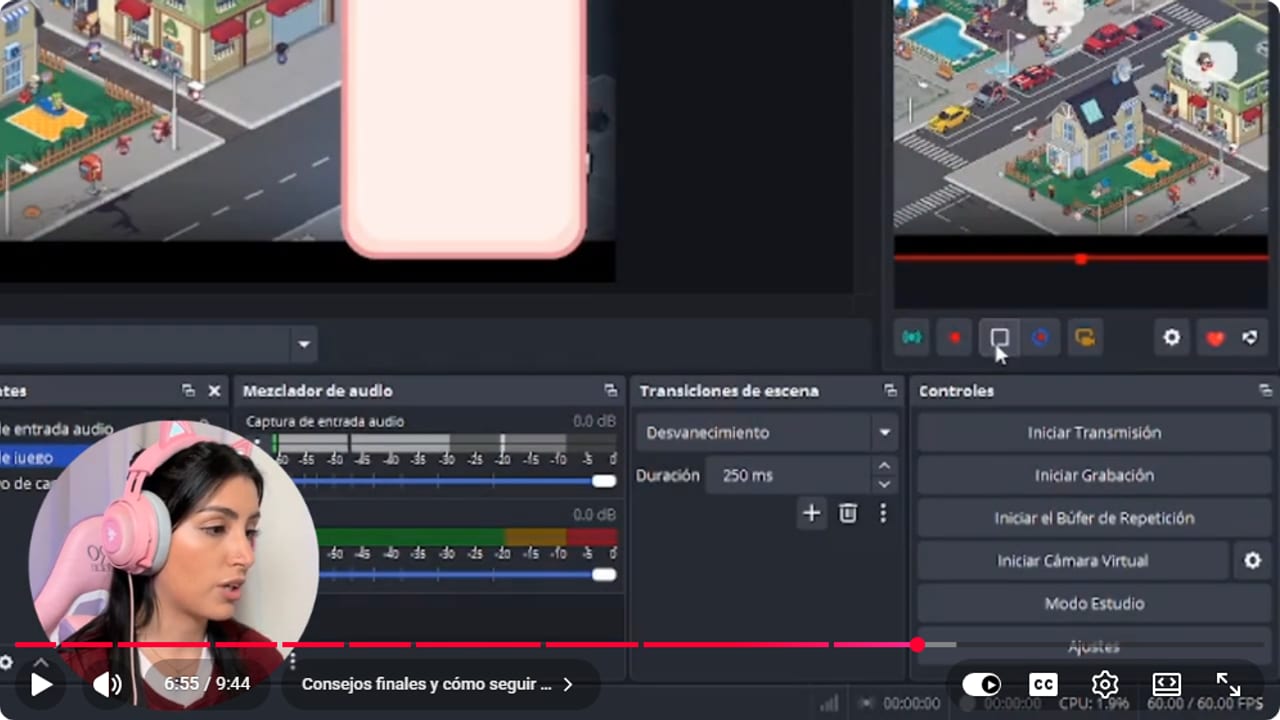
This is the button everyone forgets. If it isn't active, the save hotkey records nothing. YouTube · 6:56 ↗
If something does not work
- You press the hotkey and the clips folder stays empty
- It's nearly always the backtrack button being off, so click it under the vertical preview until it lights up. Also check there's a folder set as the recording path, that the option to run backtrack while streaming or recording is ticked in the vertical settings, and that audio capture is on. Make a test clip before every stream, not during the epic moment.
- The hotkey does nothing while you're in the game
- OBS can ignore hotkeys when it isn't the active window. In Settings, Advanced, set the hotkey focus behaviour to never disable hotkeys, which is what Aitum's own guide recommends. If you use a Stream Deck, map the same key combination there.
- Twitch only lets you download the landscape version
- That clip's portrait version doesn't exist yet. Open it with the scissors, click Edit Layout, change something in the framing, save and wait a minute. The portrait download then appears under Share.
- Every portrait clip comes out landscape with black bars
- Twitch doesn't have your layout preference yet. Edit the portrait layout of any one clip, Stacked or Full, and save it. New clips use that layout from then on.
- Aitum Vertical isn't in the Docks menu
- Check your OBS version, because Aitum Vertical's official page now asks for OBS Studio 32 or newer. Update OBS, close it completely and run the plugin installer again.
Test before you go live
- Your portrait layout is saved with your camera on top and the game below.
- Your username sits inside the area the portrait crop keeps.
- The backtrack button is on before you start playing.
- A test backtrack clip has clear audio for both your voice and the game.
- You know where your Twitch clips and your Aitum folder live.
- And that's it: your next jumpscare already has a home on TikTok.
Hace CLIPS para TikTok y Reels SIN editar - GRATIS y RAPIDO
Watch the full tutorial (in Spanish) ↗Common questions
Are both methods free?
Yes. Twitch's clip editor and Aitum Vertical cost nothing. The paid things are Nexus, a separate Aitum tool, and AI apps like Opus Clip, and you don't need either for this guide.
Can my viewers make the clips for me?
Yes, and that's the easy way to use the first method. Any clip made of your channel uses your saved portrait layout. In your clip settings you decide who can clip, for example only followers or subscribers.
Can I clip without taking my hands off the controller?
Yes. Say Twitch, Clip That out loud while you're live and Twitch creates a clip on its own, which then shows up in your Clips Manager. With Aitum Vertical, your save hotkey does the same job.
How long can each clip be?
On Twitch, up to 60 seconds. With Aitum Vertical's backtrack, you choose the length in the vertical settings. I use 60 seconds, which covers the moment plus a bit of context.
Do I need to edit them before posting?
Not really. If you want captions in your own style, run them through CapCut, which is free. ChatGPT can suggest a description, but read it and fix it, because it tends to sound like a robot writing its first TikTok.


