
Short answer
Before you start
- A Descript account. As of October 9, 2026, the free plan gives you 60 media minutes a month, exports at 720p with a watermark and includes 100 one-time AI credits.
- Your recorded video, ideally in short parts, or one file per camera for a podcast
- A solid internet connection, since the work happens in the cloud
- Optional: your podcast overlays from Canva, plus your intro and outro
Bring your setup to a 24/7 AI Streamer Coach
Ask Streamer Coach →Get personalized feedback to fix streaming issues and plan your next content.
Step by step
- 01
Create the project, upload your parts and insert them into the script
Nicole Rojas | YouTube | 1:48 ↗Spent hours editing a video that runs under 10 minutes? Been there. Go to your workspace, click New folder and make one, say YouTube, so every project has a home. Inside it, click New project, pick video and give it the same name as the video you're editing. Under Files, click + and upload your clips. Record in parts if you can: shorter files mean the AI works faster. Once a file loads, click its three dots, choose Insert into script, then tell Descript how many people are speaking and in which language.
What you should see: Everything you said shows up as text on the left, with your name above each block.
- 02
Remove silences with Shorten word gaps
Nicole Rojas | YouTube | 3:32 ↗Read the transcript first and fix any words it didn't know. It spelled Kick wrong for me and swapped my Argentine verb forms, so I fix those by hand. Then open AI Tools and choose Shorten word gaps. Set how much silence to keep between sentences: I use 0.8 seconds for a tutorial so it stays easy to follow. For a podcast with a deep conversation, keep more, because those pauses mean something. Check the list and click to cut them all.
What you should see: The project's running time drops and the long pauses disappear from the text.
- 03
Clean up your voice with Studio Sound and a compressor
Nicole Rojas | YouTube | 5:14 ↗Select the whole video and go to AI Tools, Studio Sound. It strips background noise and cleans up the voice. In Properties, under Audio effects, click the settings icon and change Intensity. If your mic already sounds good, don't leave it at 100, or your voice turns a bit robotic. I set mine to 70 or 80. Then click + next to Audio effects, add a Compressor and keep the voiceover preset.
What you should see: Audio effects shows Studio Sound switched on at your percentage, with the Compressor underneath.
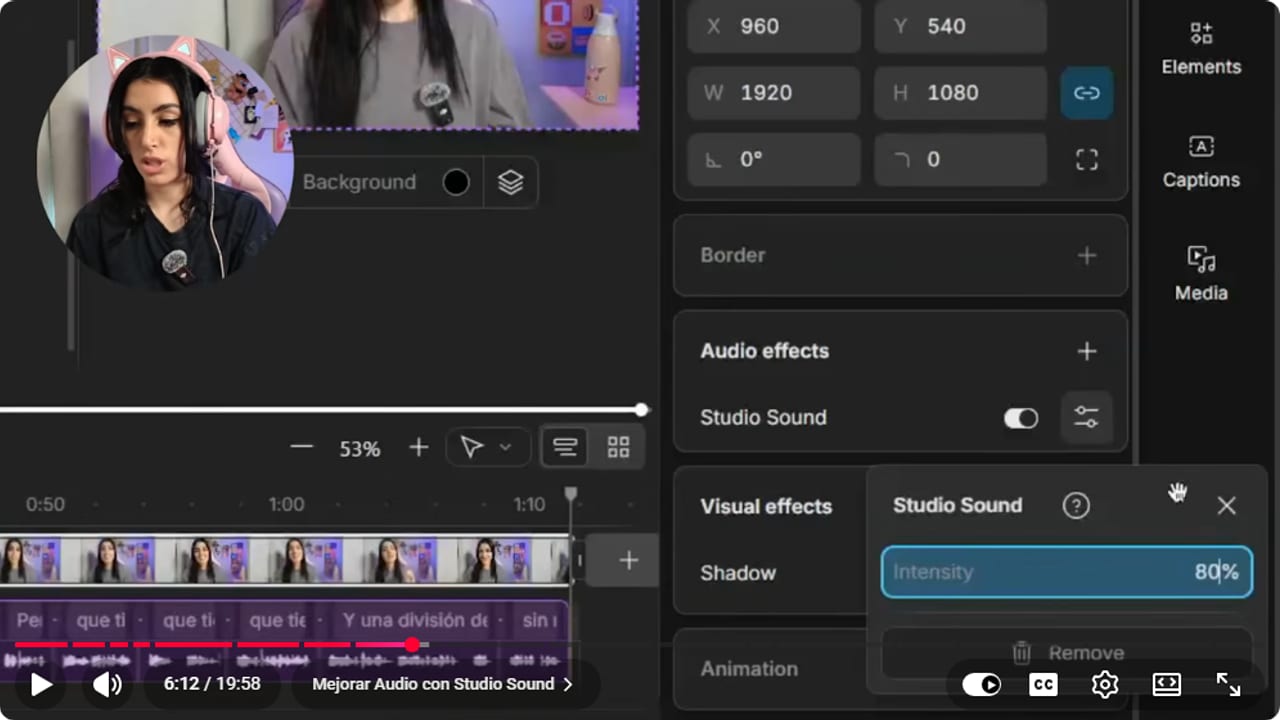
With a good mic, drop Intensity to 70 or 80 so your voice doesn't sound robotic. YouTube · 6:13 ↗ - 04
Edit by deleting text, like a document
Nicole Rojas | YouTube | 6:44 ↗Here's the fun part. Read through and delete what you don't need, just like in Word: select the repeated take and hit delete. Not sure? Select it and choose Ignore instead. It gets struck through and drops out of the video, and you can bring it back later. For captions, click a misspelled word, choose Correct and type the right one. The slash key (/) splits the video into scenes. To move faster, bump playback speed to 1.5x or 2x.
What you should see: The lines you deleted no longer play, and ignored ones appear struck through in the text.
- 05
Add automatic captions
Nicole Rojas | YouTube | 8:20 ↗Lots of people watch on their phone with the sound off or with noise around them, so captions aren't optional. Open Captions and, under Apply to, pick All scenes if you split the video, or This scene for just one. Choose a style from the list. Then tweak the font, size, color, the highlight color for the word being spoken, the background and the animation. You can also pick one or two lines, word by word or full sentence. For tutorials I go with the full sentence and no animation.
What you should see: Captions sit on top of the video, and the spoken word changes color as it plays.
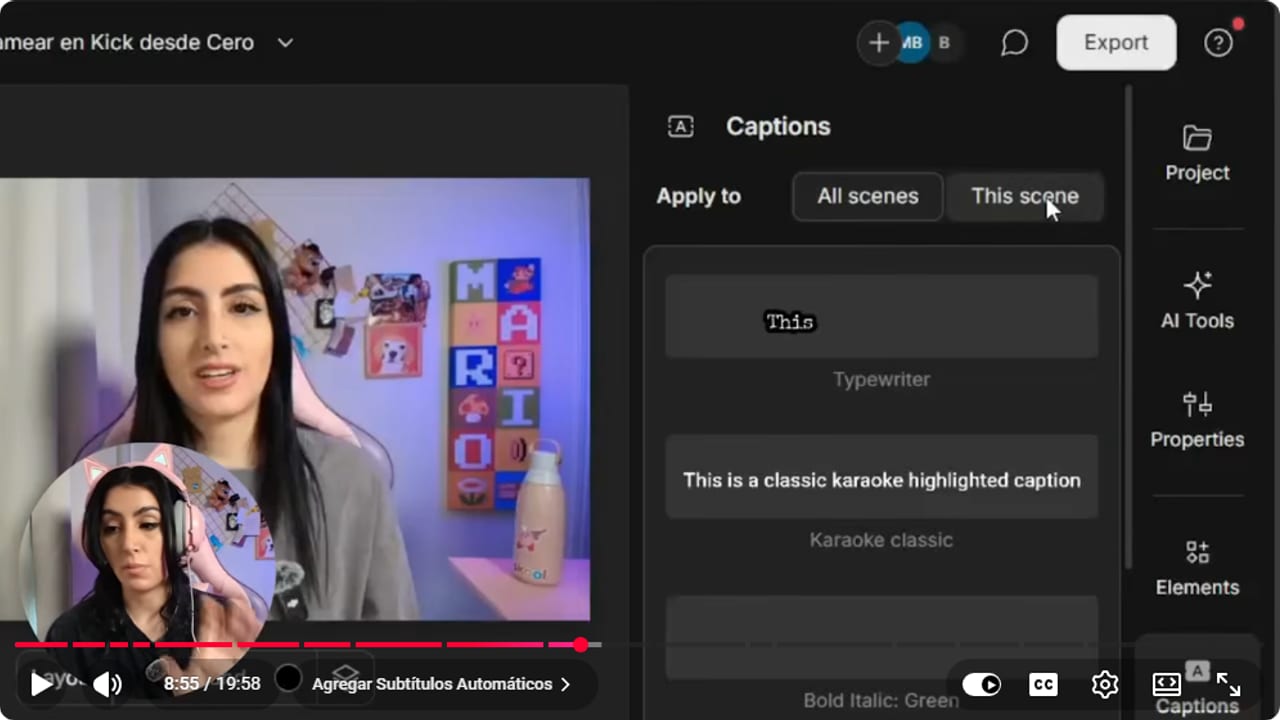
If you split the video into scenes, pick All scenes so captions cover the whole thing. YouTube · 8:56 ↗ - 06
Add background music from the stock library
Nicole Rojas | YouTube | 10:08 ↗Jump to the start of the video, open Media, choose Stock, then Audio, and search for instrumental. Preview a few tracks and click + on the one you like to drop it into the timeline. Click the music, open Properties and set the volume somewhere between 10 and 15 so it sits under your voice. If there's a section where you don't want music, press B to cut at both ends, A to select the piece, then delete it.
What you should see: The music track shows up under the video and your voice comes through clearly on top.
- 07
Podcast: upload each camera and build a sequence
Nicole Rojas | YouTube | 1:10 ↗For a two-camera podcast you need one file per person, for example recorded with Source Record in OBS. Make a project called podcast and upload both files under Files, or three if you also recorded your screen. Once they finish loading, click +, choose Sequence and delete the track it starts with. Add camera one, then a new track with camera two, and set both to volume 100. Now they're stacked on top of each other.
What you should see: The sequence shows two stacked tracks, each with its own waveform.
- 08
Podcast: line up the audio peaks and name each speaker
Nicole Rojas | YouTube | 2:35 ↗Both cameras recorded the same conversation, so the audio has to match. Zoom into the timeline and slide one track until the audio peaks line up. Press play and check that mouths move with the sound. Keep your own layer on top, it helps with the templates later. Click Done, rename the sequence to something like podcast part one, and use its three dots to insert it into the script. Then put your name on speaker 1, your guest's on speaker 2, and set the language.
What you should see: The transcript shows each person's name above what they said.
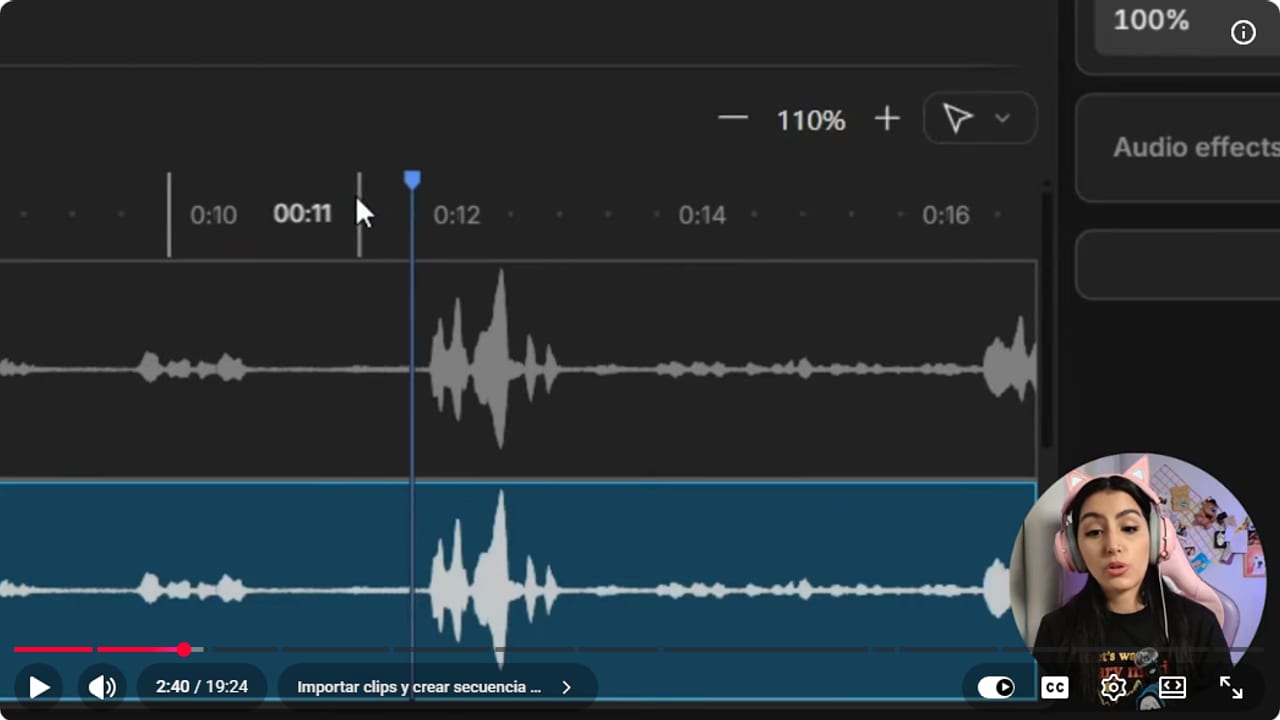
Once both cameras' peaks line up, lips and sound stay in sync. YouTube · 2:41 ↗ - 09
Podcast: trim the gaps and clean the audio on both cameras
Nicole Rojas | YouTube | 4:06 ↗Before improving the sound, go to Tools and run Shorten word gaps, so Descript doesn't process silences you're cutting anyway. For a conversation I keep 3 seconds. Then go back to Tools and turn on Studio Sound, which applies to both layers in the sequence. With good mics, drop it to somewhere between 50 and 80. Listen to a line and, if it sounds robotic, adjust it in Properties. After that, edit by deleting text like before, with a last pass at 1.5x or 2x so nothing gets clipped.
What you should see: When you play a line, both voices sound clean with no echo, and the sequence is shorter.
- 10
Podcast: apply a multicam layout and your overlays
Nicole Rojas | YouTube | 8:42 ↗Click the video, open Properties and go to Layout, Multicam. Pick one for two cameras, or three if you're adding gameplay or a reaction video. Double-click each camera to frame it, and zoom in if you shot it too wide. If you made overlays in Canva, add them with + from your computer, drag them into the scene and apply the chroma key effect, the same filter you'd use in OBS. Once it looks right, click the scene's three dots and choose Save scene as new layout.
What you should see: Both cameras sit side by side inside your overlay, and your layout appears at the bottom of the Multicam list.
- 11
Podcast: let active speaker switch cameras for you
Nicole Rojas | YouTube | 11:30 ↗Don't want to pick who's on screen every few seconds? Click the timeline, open Properties, Layout, Multicam, and set the layer to Automatic. Under Style, choose Automatic or Show only active speaker. Under Cutaways, decide whether cuts happen occasionally or every time someone talks. In Camera setup, match each speaker to their camera and click Submit. It's great for long conversations or when you're short on time. Then go back through the scenes and switch by hand where you want a reaction shot or where both people talk at once.
What you should see: On playback, the video cuts on its own to whoever is talking.
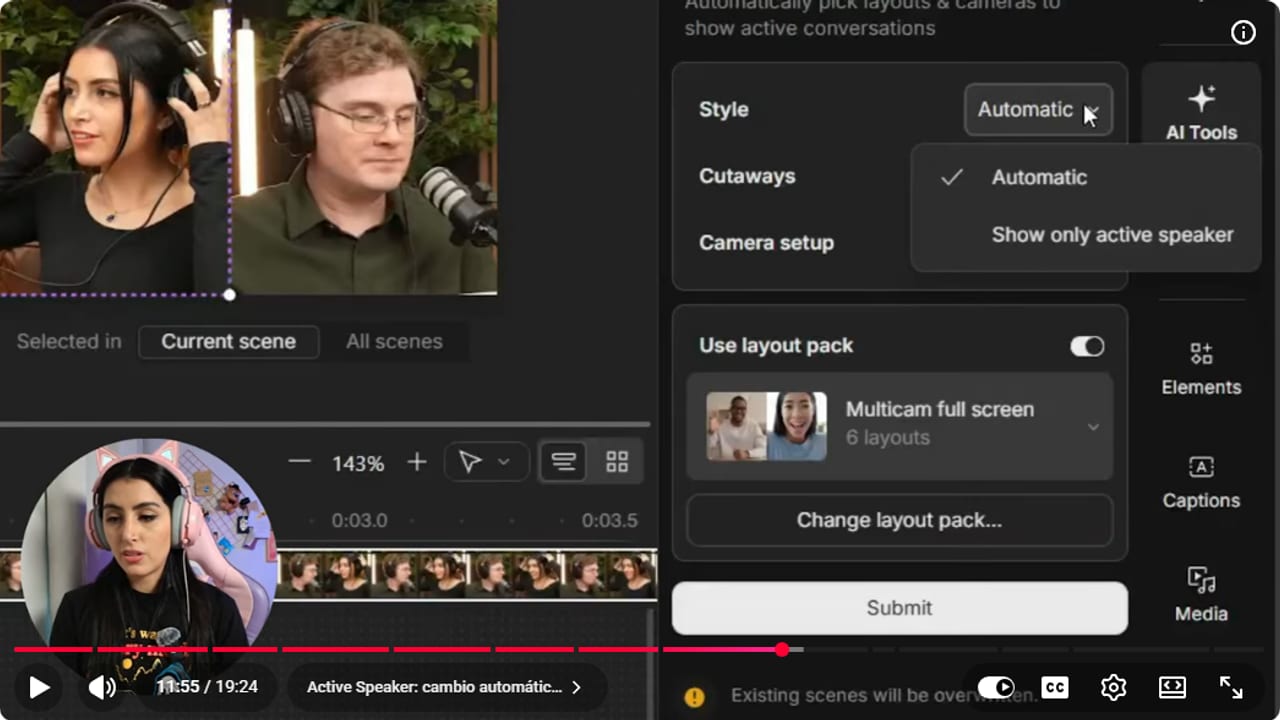
Pick Automatic or Show only active speaker under Style, then click Submit. YouTube · 11:56 ↗ - 12
Export at 1080p and upload it as private
Nicole Rojas | YouTube | 17:05 ↗Click Export, choose Video and name it. Set Destination to Local export. If you split the video into parts, set Export options to All compositions. Under Resolution pick the highest it offers, 1080p for YouTube. For 4K, your source file has to be 4K. Set Quality to High and leave Advanced alone. If you publish straight to YouTube, keep it private until it finishes processing and the copyright check is done. I'd rather download it and upload by hand, so I can choose the thumbnail, playlist and date. And that's it, your editing now takes a fraction of the time.
What you should see: When the export finishes, the video file appears in your downloads folder.
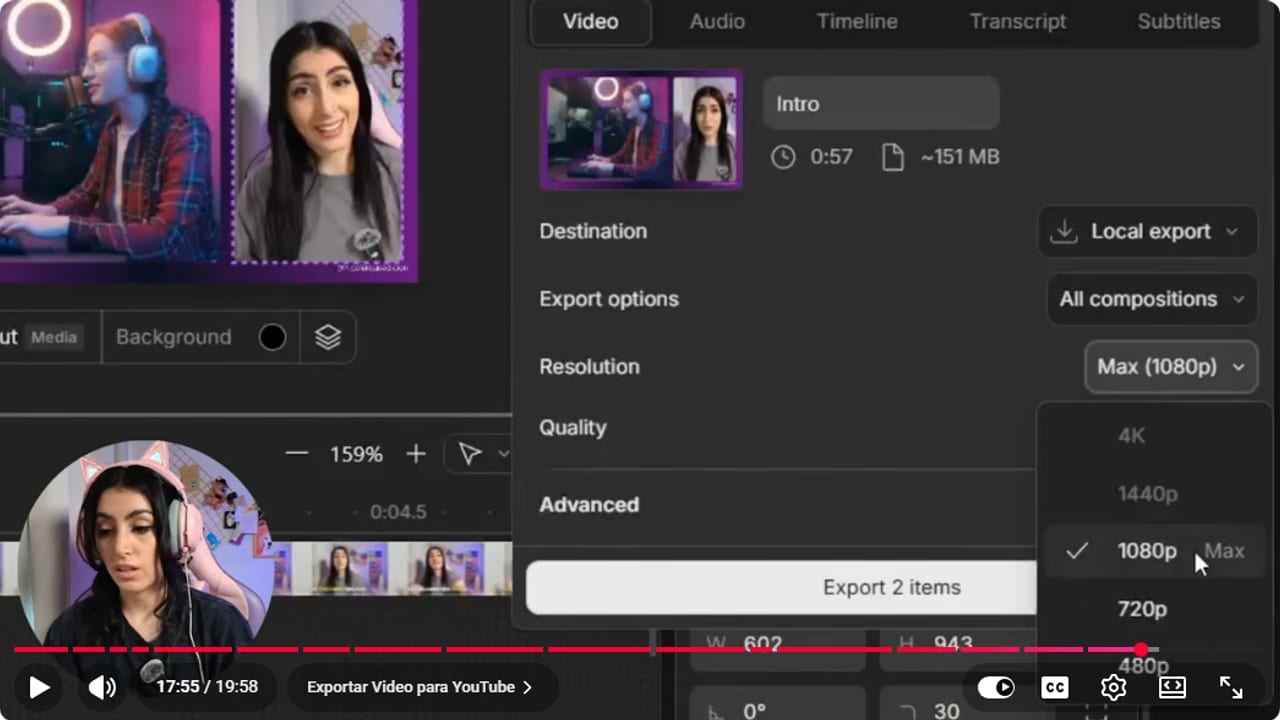
Local export, All compositions and the highest resolution offered, here 1080p. YouTube · 17:56 ↗
If something does not work
- Your voice sounds robotic after Studio Sound
- With a decent mic, 100% intensity overdoes it. Drop it to 70 or 80 for a regular video, or 50 if you recorded in a studio, and listen to a line before moving on. You want clean, not satnav.
- Transcription takes forever or the app freezes
- Descript runs in the cloud, so long files take longer to upload and transcribe. Record in shorter parts. For a podcast sequence, upload the files first and only build the sequence once they've loaded.
- Remove filler words or retakes don't catch anything in Spanish
- When I recorded these videos, those tools only worked on English audio. Test them on a short clip, and if nothing gets flagged, delete the filler words by hand while playing back at 1.5x or 2x.
- In the podcast, mouths don't match the sound
- The sequence tracks aren't aligned. Zoom in, slide one track until the audio peaks match and press play while watching the lips. Zooming in makes it easier to spot the peak of a loud word and use it as your marker.
- Cutting by text clips the end of a word
- Open the timeline and zoom in. The gray vertical lines are the cuts, and you can drag them until the word plays in full or you get the gap you want.
Test before you go live
- You read the full transcript and fixed the names that show up in captions.
- The music never drowns out a sentence when you listen on headphones.
- In the podcast, you checked the scenes active speaker picked and changed the ones you didn't like.
- The export is 1080p or the highest resolution your source allows.
- If you're publishing straight to YouTube, it goes up private until processing finishes.
- Editing night now wraps up before dinner.
Cómo editar videos mucho más rápido con IA en Descript
Watch the full tutorial (in Spanish) ↗Common questions
Is Descript free?
There's a free plan. As of October 9, 2026 it includes 60 media minutes a month, 720p exports with a watermark, 100 one-time AI credits, and limited Studio Sound and automatic multicam. I use the Creator plan, which exports in 4K with no watermark. Check Descript's pricing page before you pay for anything.
Does it work with Spanish videos?
Yes, it transcribes Spanish and you choose the language when you insert the file. Fix platform names and regional verb forms by hand, since those tend to get changed. Some AI tools, like filler word removal, only worked in English when I recorded the tutorials.
How much silence should Shorten word gaps keep?
For a tutorial, about 0.8 seconds, so it's easy to follow without feeling rushed. For a podcast on heavier topics, keep more, because those pauses are part of the conversation. On my sample podcast I kept 3 seconds.
Do I need each podcast camera recorded separately?
Yes, multicam needs one file per camera. You can record them with Source Record in OBS. If you only have one shot with both people in it, use the regular video workflow.
Can I finish the edit in another program?
Yes. The Timeline tab in Export sends your edit to Premiere, DaVinci Resolve, Final Cut, Audition or Reaper. You can also download just the audio, the transcript or the captions.
Should I use Quick design or layouts?
Quick design cuts the video and adds effects for you, and it saved me when I was starting out. The eye contact effect it adds sometimes looks fine and sometimes looks deeply weird, so check it. If you want control, build your own layout and reuse it.


