

Short answer
Before you start
- Your Twitch channel with VOD saving switched on (they expire after 7 days on most channels)
- A YouTube channel, verified if you want to export videos longer than 15 minutes
- For long streams: OBS Studio recording while you stream
- For long streams: DaVinci Resolve (free) or Premiere
Bring your setup to a 24/7 AI Streamer Coach
Ask Streamer Coach →Get personalized feedback to fix streaming issues and plan your next content.
Step by step
- 01
Turn on VOD saving in Twitch
Nicole, saving the VOD ↗Your stream's over and the thought of rewatching three hours of it is giving you a mild panic. Relax, this won't eat your whole day. First, make Twitch keep your streams. Click your profile picture, then Creator Dashboard, Settings, Stream. Your stream key lives here, and nobody else gets to see it. Further down, under VOD and Stream Rewind settings (Nicole's wording in the video), switch on the option that stores your past broadcasts automatically. Twitch now calls it "Store Past Broadcasts" in Stream Settings, so look for that name if you don't see the old one. In the video Nicole says streams are kept for 7 days. Twitch now says 7 days for most channels, 14 for Affiliates and 60 for Partners, Prime and Turbo. Cut or download before they expire.
What you should see: The option to store past broadcasts automatically (now called Store Past Broadcasts) shows as on in your stream settings.
- 02
Pick a method to match the stream
Nicole, choosing a method ↗Both methods are free. Method one is editing inside Twitch, best for short streams, demos or speedruns that got straight to the point. Method two is recording in OBS and editing in an editor, for long games with lots of dead time, like when you got stuck or got up and left. If your YouTube is already connected to Twitch, method one is even quicker.
What you should see: Content, Video Producer lists your saved streams, ready for you to pick one.
- 03
Trim the stream in the Highlight editor
Nicole, Twitch Highlighter ↗Yes, Twitch has an editor. Go to Creator Dashboard, Content, Video Producer, pick the stream and click Highlight. The gold bar marks what gets kept. Skip ahead to where the good part starts and type that time as the start, or drag the gold handle. Your keyboard arrows help you fine-tune. If the stream froze in the middle, go to that point, click "Split segment at playhead" (Nicole calls it split segment), mark where you start playing again, select the middle piece and click "Remove selected segment" (Nicole says delete segment).
What you should see: Only gold sections remain on the timeline, and the piece you deleted is gone.
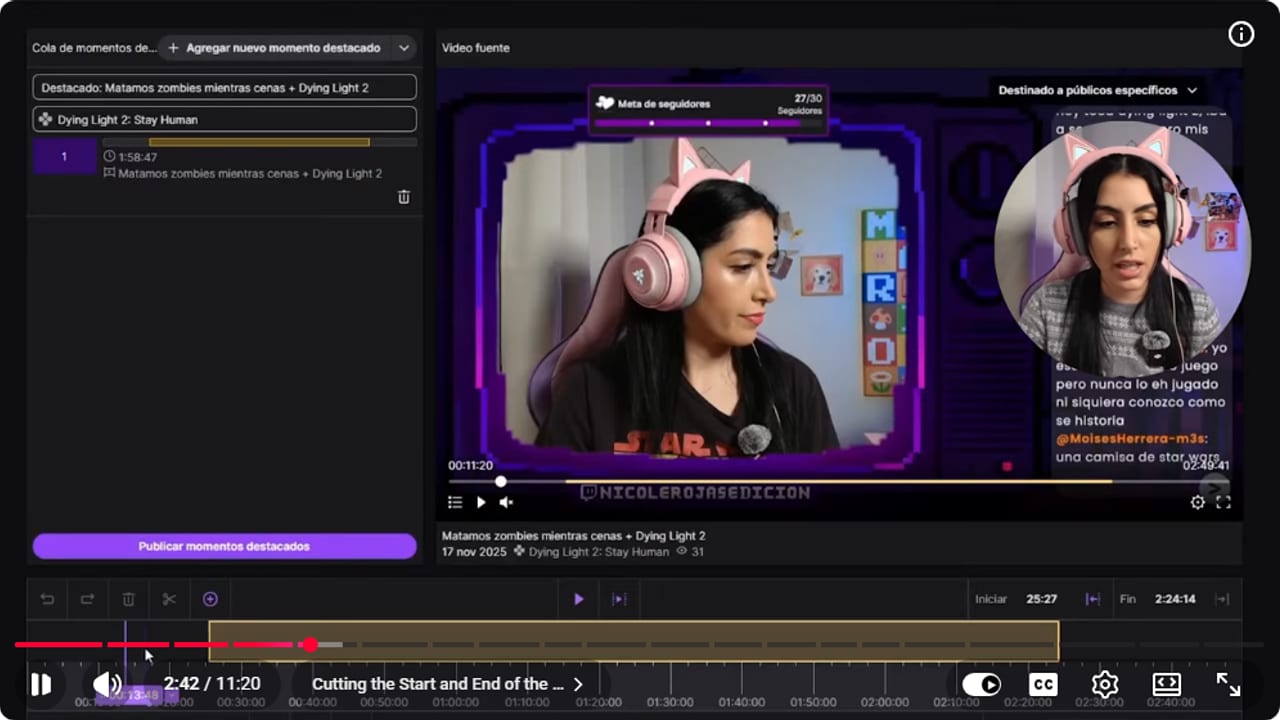
The gold handles mark the section kept in the Highlight. YouTube · 2:42 ↗ 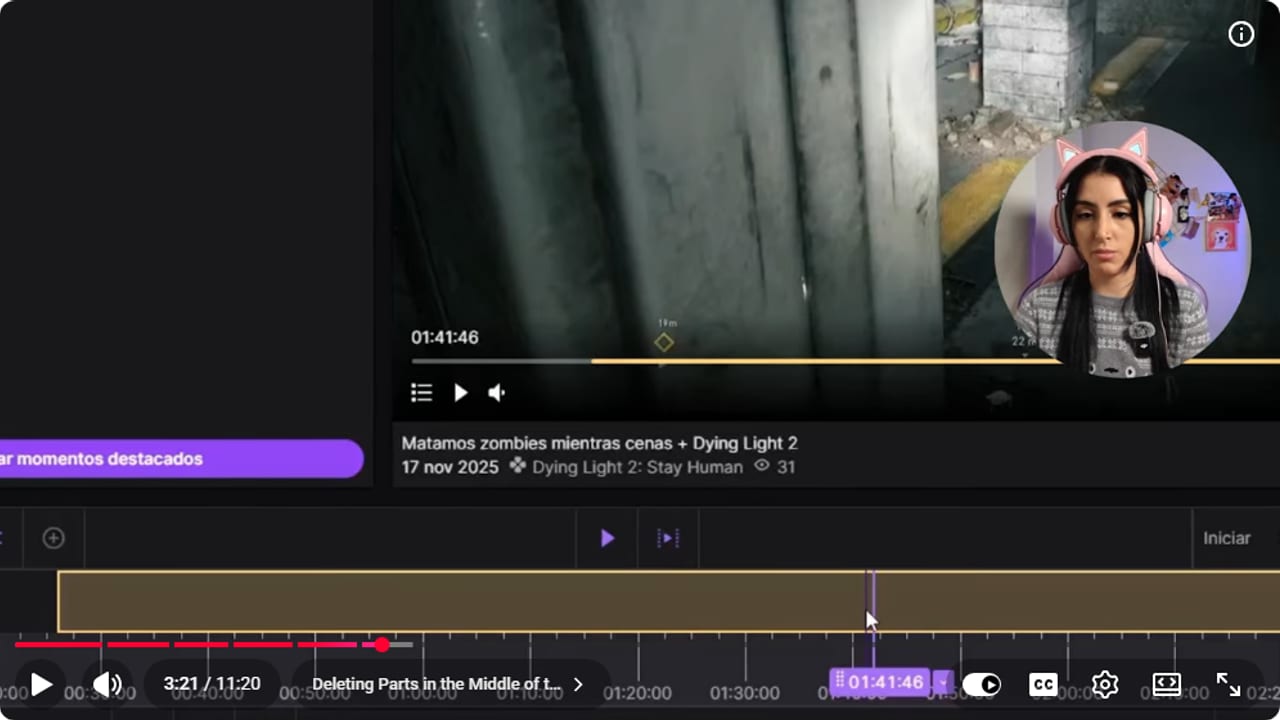
Splitting the timeline lets you remove a pause in the middle. YouTube · 3:22 ↗ - 04
Publish the Highlight
Nicole, publishing a Highlight ↗Give it a title and click Publish Highlight. Below, just like on YouTube, add a thumbnail, description, language and category. The longer the stream, the longer the preview takes to build. Highlights stay stored even after the original VOD expires, within a combined 100-hour limit across Highlights and uploads.
What you should see: The Highlight shows up in Video Producer with its title and thumbnail.
- 05
Export it to YouTube as Private
Nicole, exporting to YouTube ↗In Video Producer, click the three dots on the Highlight. Choose Download to upload it yourself, or Export and connect your YouTube account. When exporting, fill in the title, description, tags and visibility. Pick Private, because YouTube takes a while to process full quality, often an hour or more. Heads up: if your YouTube channel isn't verified, it forces you to split the video into 15-minute parts.
What you should see: YouTube Studio lists the video as Private and processing on your channel.
- 06
For long streams, record in OBS while you stream
Nicole, recording for editing ↗Go to Settings, Output, and under Recording choose the folder where files are saved. Use MKV, which doesn't lose everything if OBS crashes, and Audio Track 1. Then, under Advanced, in the Recording section, turn on Automatically remux to MP4, so you end up with a file that's ready to edit.
What you should see: When the stream ends, your recordings folder has the MKV file plus an MP4 copy.
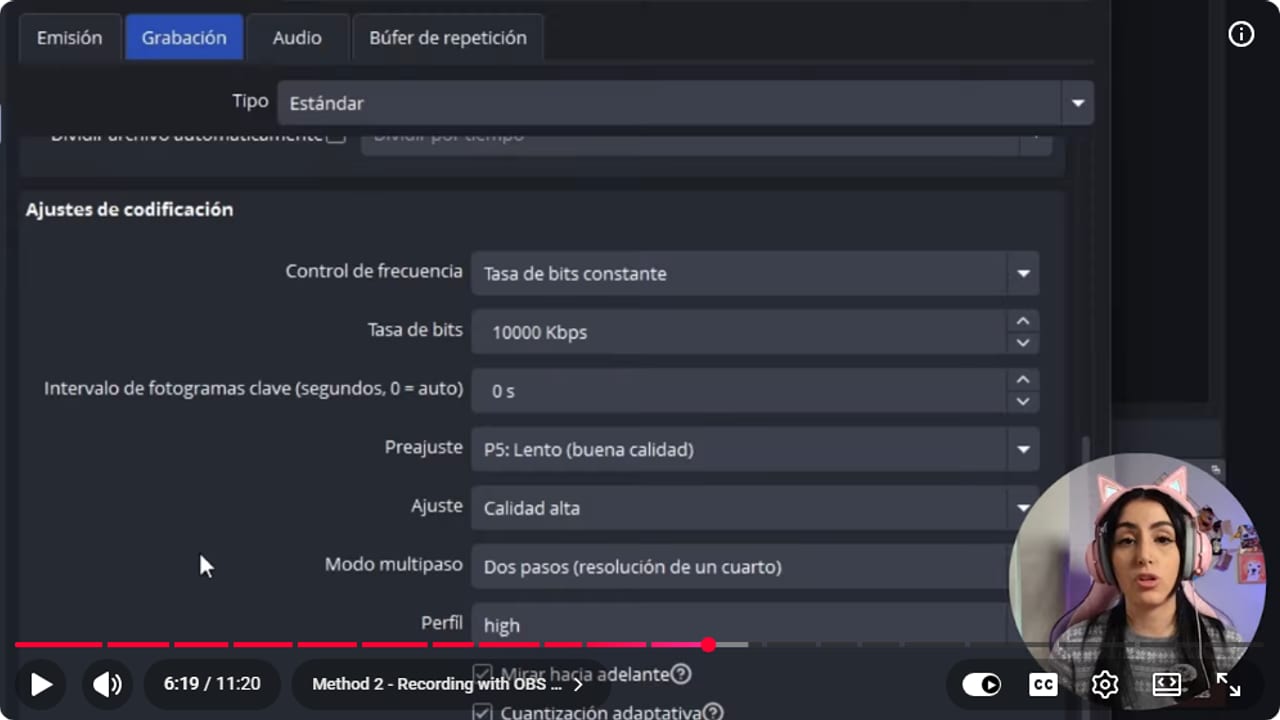
The local recording keeps a file for a more detailed edit. YouTube · 6:19 ↗ - 07
Edit in DaVinci Resolve or Premiere
Nicole, editing the file ↗Open your editor. I use Premiere, but DaVinci Resolve is free and works almost the same. Import the video and drag it onto the timeline. Or open it in the source monitor, set an in point with I and an out point with O, and drag just that part over. Cut whatever drags, like the stretches where I wandered around lost in Silent Hill. For clips, look for audio peaks: that's where you screamed, laughed or talked loudly.
What you should see: The timeline shows your stream in blocks, minus the long stretches where nothing happened.
- 08
Export at source quality and upload to YouTube
Nicole, final export ↗In Premiere, press Ctrl+M, name the file and choose Match Source, so it comes out at the original quality without fiddling with settings. On YouTube, click Create, Upload video and pick the file. Fill in the title and description, and use the option to upload three thumbnails and see which performs best. Add it to a playlist, which helps YouTube work out who to show it to. Under Visibility, choose private, unlisted, public or scheduled, and a scheduled video can be a Premiere that notifies your followers.
What you should see: YouTube Studio shows the video with its thumbnail, playlist and the visibility or premiere date you picked.
- 09
Do the cuts right after the stream
Nicole, the 5-minute routine ↗For the full stream you don't need to add music or captions: cut, join and export. My advice: right after the stream ends, stay at your desk, open Highlights and trim the start, the end and anything extra in the middle. It takes literally 5 minutes. Export it to YouTube as Private even if you're not posting it yet. Once you've got 10 streams saved, schedule one Premiere a week and you'll have more time for thumbnails. And that's it, stop overthinking and get your VOD on YouTube.
What you should see: Your private streams pile up in YouTube Studio, ready to schedule.
- 10
Next stream, drop markers
Official Twitch help: Highlights and Stream Markers (bonus tip) ↗Bonus tip from Twitch's help pages, not from the video: during the live you can drop stream markers when a match starts or something good happens. Use the Add Stream Marker quick action in the Stream Manager of your dashboard, or type /marker plus a description in chat, for example /marker final boss. The markers then show up on the Highlighter timeline, so when you edit you start from a list of moments instead of three hours of scrubbing.
What you should see: Opening the stream in the editor shows your markers along the timeline, each with its note.
If something does not work
- Video Producer is empty
- If you've only just turned on VOD saving, that's normal. Only streams from now on get saved, so your next one will show up. And remember each VOD expires: 7 days on most channels, 14 for Affiliates and 60 for Partners, Prime and Turbo.
- YouTube makes you split the video into 15-minute parts
- Your YouTube channel isn't verified. Verify it with your phone number: YouTube sends you a code by text or voice call, and that lets you upload videos longer than 15 minutes.
- The video looks blurry on YouTube
- YouTube hasn't finished processing full quality yet, which can take an hour or more. Leave it Private and publish once it looks sharp.
- OBS crashed mid-stream and you're scared the recording is gone
- That's exactly why you record in MKV: the file is saved up to the moment it crashed. With automatic MP4 remux on, you edit it as usual.
- Three hours of footage and no idea where to start
- Look for audio peaks on the timeline, which is where you screamed or laughed. Start there and cut the long bits where you were just wandering around.
Test before you go live
- You copied or exported the Highlight before the VOD expires (7, 14 or 60 days depending on your channel).
- You used the right method: a Highlight for short streams, OBS for long ones.
- The exported file plays start to finish with sound.
- If you scheduled a Premiere, the date is in your calendar.
- You know how many hours of Highlights and uploads you have stored, since the combined limit is 100.
- You've got a date for the next cut. No more excuses.
Cómo editar tus streams de Twitch para subirlos a YouTube
Watch the full tutorial (in Spanish) ↗Common questions
Can I edit everything inside Twitch?
For simple cuts, yes: the Highlight editor lets you trim the start and end and delete segments in the middle. For long streams with a lot of dead time, record in OBS and edit in DaVinci Resolve or Premiere instead.
Why upload as Private first?
YouTube takes time to process full quality, sometimes an hour or more. While it's Private you can swap the thumbnail or add details without anyone seeing the blurry version.
Why does YouTube cut my video into 15-minute parts?
Because your channel isn't verified. According to YouTube help, verifying it with your phone number unlocks uploads longer than 15 minutes.
Do I need to add music or captions to a VOD?
No. For a full stream, cutting, joining and exporting is enough. Save captions and memes for short clips.
Is there a free AI tool that makes clips for me?
I haven't found a free one that makes clips directly. In the meantime, audio peaks in your editor make a pretty good moment detector, and they don't charge.


