OBSAUDIO TRACKS
How to split OBS audio tracks for a copyright-free VOD and recording
Record in OBS with mic, game, music, Discord and alerts on separate tracks, keep music off your Twitch VOD, and upload gameplay to YouTube without claims.


Short answer
Before you start
- OBS Studio with each sound as its own source: mic, game, music, Discord and alerts
- An editor that reads multiple audio tracks: Premiere (paid), CapCut or DaVinci Resolve
- For the VOD track, your Twitch account connected under Settings, Stream
- A few minutes for a test recording before your next stream
Bring your setup to a 24/7 AI Streamer Coach
Ask Streamer Coach →Get personalized feedback to fix streaming issues and plan your next content.
Step by step
- 01
Switch OBS output to Advanced mode
Nicole Rojas | YouTube | 2:13 ↗You recorded your stream, opened it to edit for YouTube, went to turn the music down, and found everything glued into one track. Not great. Your OBS works fine. By default it just records everything to a single track. Go to Settings, Output, and set Output Mode at the top to Advanced. Then open the Recording tab.
What you should see: You can see the Streaming, Recording, Audio and Replay Buffer tabs, with Recording selected.
- 02
Tick all six audio tracks under Recording
Nicole Rojas | YouTube | 2:28 ↗Scroll to Audio Track. Only 1 is ticked, which is the default. Tick all six. Four is enough if you only have four sources, but six means you won't lose anything. Click Apply and OK. That tells OBS to record six separate tracks, but you still have to tell it what goes on each one.
What you should see: Audio Track shows boxes 1 through 6 all ticked.
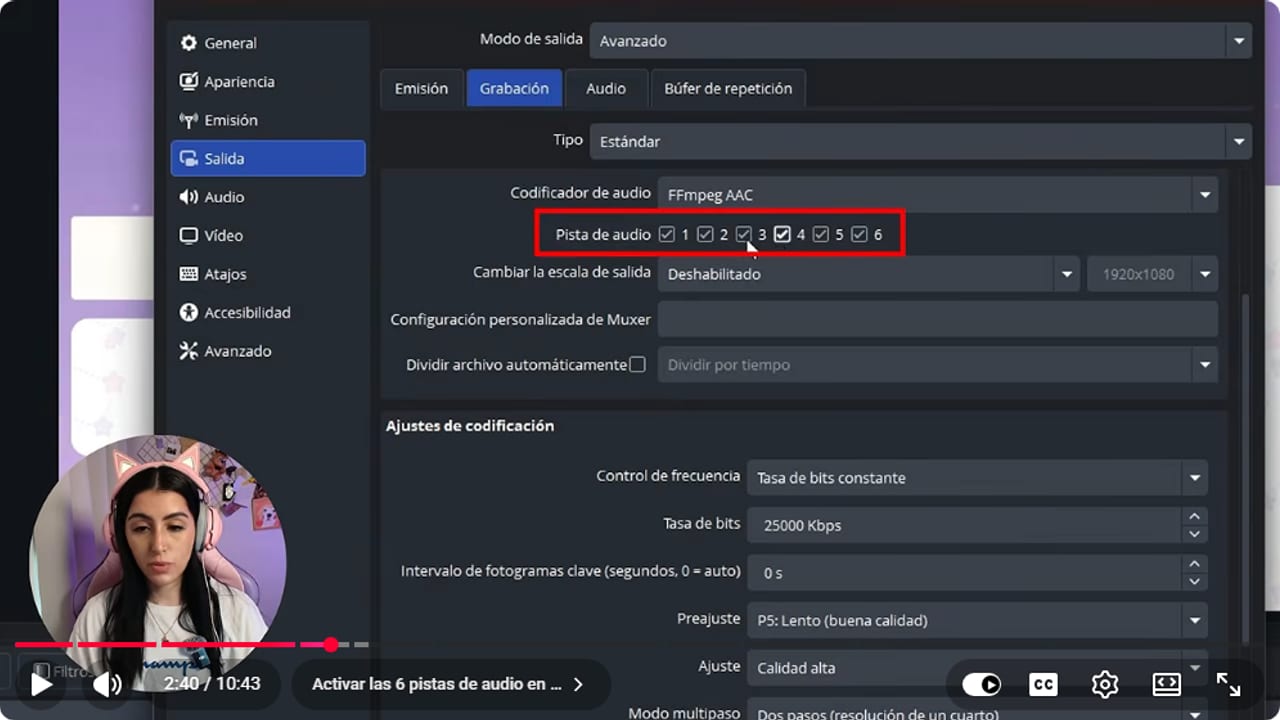
With all six ticked, OBS records six separate tracks. You still have to tell it what goes on each. YouTube · 2:41 ↗ - 03
Decide what goes on each track
Nicole Rojas | YouTube | 2:56 ↗Here's the plan I recommend. Track 1: the full mix, everything together, your normal audio. Track 2: your mic alone. Track 3: the game or desktop audio. Track 4: music only, Spotify or whatever you play. Track 5: Discord. Track 6: alerts. Write it down, because you'll use it in the next step and again when you edit.
What you should see: You have the track number for each sound written down, 1 through 6.
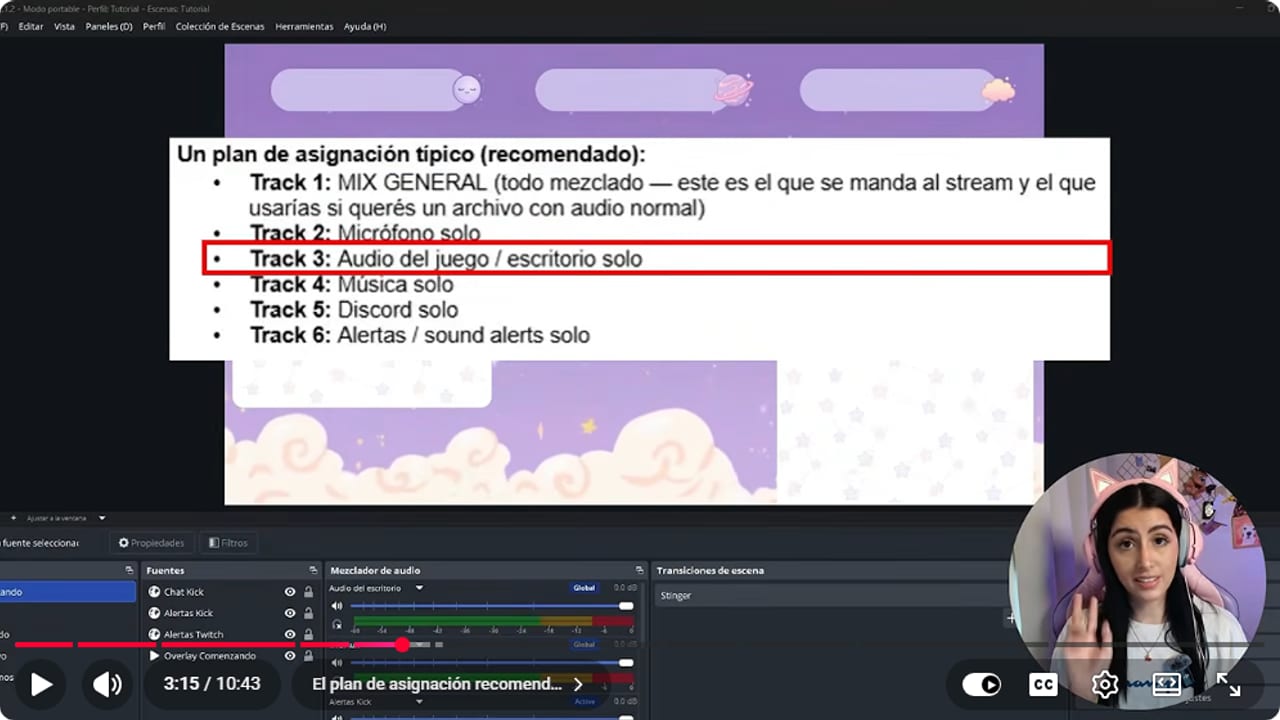
Write this plan down. You'll use it to assign sources and again when you edit. YouTube · 3:16 ↗ - 04
Open Advanced Audio Properties
Nicole Rojas | YouTube | 3:36 ↗In the audio mixer, click the gear icon and choose Advanced Audio Properties. To the right of each source there's a Tracks column with boxes 1 to 6. Notice that every source starts with all six ticked, which is why everything ends up mixed. If you have loads of sources, tick Active Sources Only at the bottom left so you only see the ones making sound.
What you should see: The Advanced Audio Properties window opens with one row per source and six boxes in the Tracks column.
- 05
Send the mic and the game to their tracks
Nicole Rojas | YouTube | 4:03 ↗Track 1 stays ticked on every source because it's your overall audio. On Mic/Aux, untick everything except 1 and 2. On Game Capture, leave only 1 and 3. For the game to get its own line, Game Capture needs Capture Audio turned on, so the sound comes through OBS and not through desktop audio.
What you should see: The Mic/Aux row shows only 1 and 2 ticked, and Game Capture only 1 and 3.
- 06
Assign music, Discord and alerts
Nicole Rojas | YouTube | 4:33 ↗Same idea. Music (Spotify, your browser or whatever you use) goes on 1 and 4. Discord on 1 and 5. Alerts, all of them, on 1 and 6. If a source has two of its own tracks ticked, that track gets mixed with another sound and stops being useful for editing.
What you should see: Each source has exactly two tracks ticked: 1 and its own.
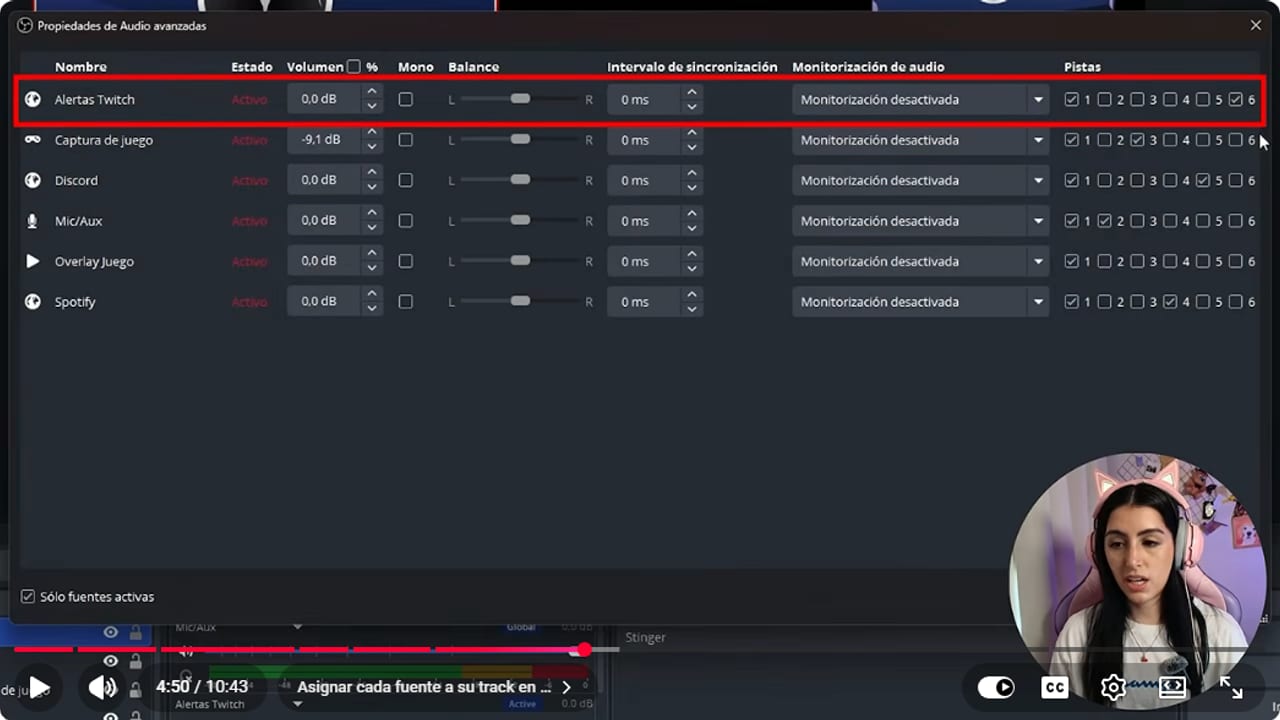
The finished setup: every source on track 1 plus its own. The overlay has no sound that matters, so it stays on 1 only. YouTube · 4:51 ↗ - 07
Leave every other source on track 1 only
Nicole Rojas | YouTube | 4:50 ↗Check the sources that are left, like overlays or the webcam, which rarely have any sound that matters. Those go on 1 only, with everything else unticked. The rule is simple: everything on 1 as a safety net, and each important sound on its own track as well.
What you should see: No source other than mic, game, music, Discord or alerts has any track from 2 to 6 ticked.
- 08
Pick the format: MKV or Hybrid MP4
Nicole Rojas | YouTube | 5:34 ↗The wrong format can leave everything stuck together even after all that work. Go to Settings, Output, Recording, and set Recording Format to Matroska Video (.mkv) or Hybrid MP4 (.mp4). I keep MKV because I edit in Premiere. For DaVinci Resolve or CapCut, Hybrid MP4 worked best for me. If you don't know which editor you'll use, go with Hybrid MP4. Check the six tracks are still ticked and click Apply.
What you should see: Recording Format shows the format you chose and Audio Track still has all six ticked.
- 09
Record a test with everything playing
Nicole Rojas | YouTube | 6:53 ↗Start the game, play a little music and talk. Send a test alert from Twitch or Kick so it ends up in the recording too. Record for a minute, then stop. The camera doesn't matter for this test, the audio does.
What you should see: A new file with the date and time of the test shows up in your recordings folder.
- 10
Open the recording in your editor and check the tracks
Nicole Rojas | YouTube | 7:30 ↗In Premiere, create a new project, import the video and drag it to the timeline. Under the video you'll see six audio lines: 1 with everything, 2 with your voice, 3 with the game, 4 with the music, 5 with Discord and 6 with the alerts. If you weren't on Discord, track 5 will be empty, and that's fine.
What you should see: The timeline shows six audio tracks under the video, and the alerts track only has a waveform where your test alert played.
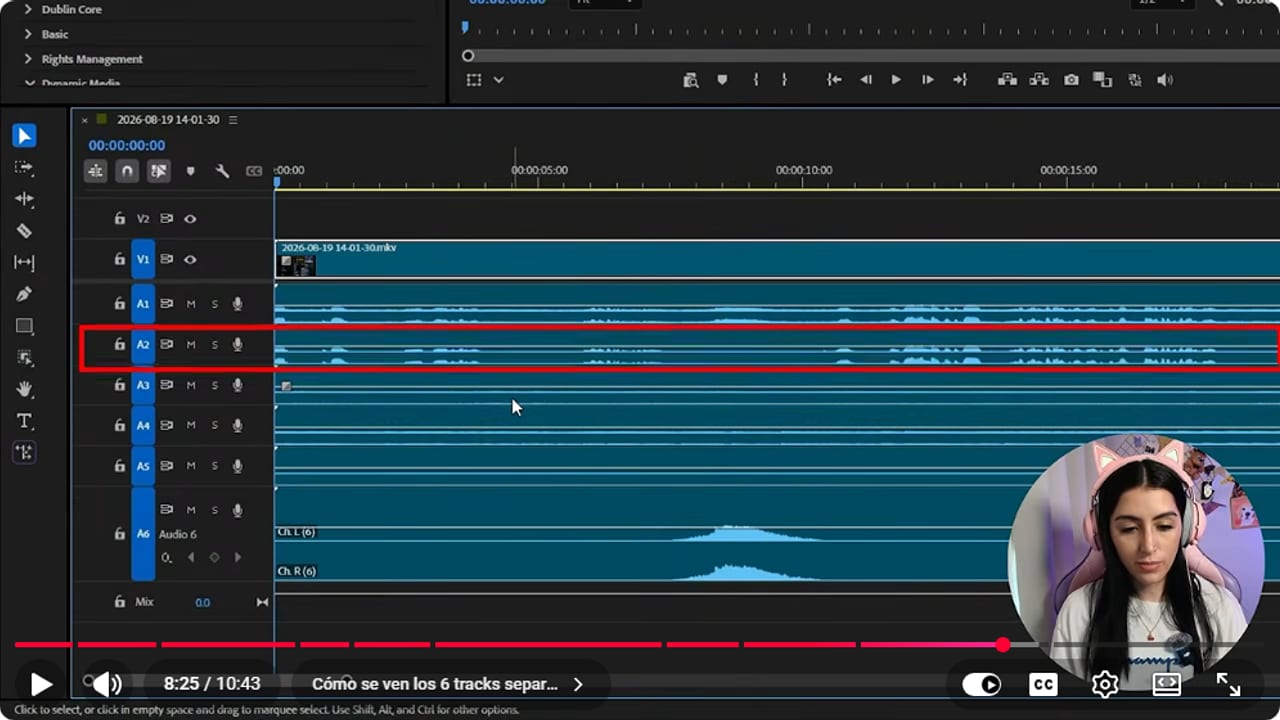
Six separate lines. A6 only has a waveform where the test alert played, so it landed on its own track. YouTube · 8:26 ↗ - 11
Keep music out of your Twitch VOD with the VOD track
OBS Knowledge Base | Twitch VOD Track ↗This one applies to the VOD saved on your Twitch channel. Your recording stays the same. OBS has a Twitch VOD Track option: the live stream uses track 1 and the VOD saves a different track you choose. Under Settings, Output, tick Twitch VOD Track. In Advanced mode it's on the Streaming tab, and in Simple mode it appears once you enable custom encoder settings. Careful: it defaults to track 2, which is your mic alone in this plan, so your VOD would be just your voice. Pick track 6, then in Advanced Audio Properties tick 6 on mic, game, Discord and alerts, never on music.
What you should see: After a test stream with music, the Twitch VOD has your voice and the game but no music in that section.
- 12
Take the music out before you upload to YouTube
Nicole Rojas | YouTube | 9:20 ↗Even if you think the music is copyright-free and you credit it, YouTube can still catch it with Content ID. It happened to me. A claim can demonetize your video or block it in some countries. With music on its own track you have three ways out. Fastest: mute track 4 and export without music. Second: replace that section with free music from the YouTube Audio Library or Pixabay, handy when the game itself has copyrighted music. Third: use copyright-free music from the start. And that's it, every sound has its own track and your gameplay is ready for YouTube.
What you should see: When you play back your export, you hear your voice, the game and the alerts, and where the music was there's silence or the new song.
If something does not work
- Your editor only shows one audio track
- Go back to Settings, Output and check Output Mode is Advanced and all six tracks are ticked under Recording. If you record in another format, switch to MKV or Hybrid MP4 and make a new test recording.
- The music track also has your voice or the game
- In Advanced Audio Properties, some other source has track 4 ticked. Every source starts with all six ticked, so go row by row and leave each source on 1 and its own track only.
- The game track is empty
- Game Capture needs Capture Audio turned on for its sound to come through that source. If your game plays through Desktop Audio instead, assign that source to track 3.
- Your Twitch VOD only has your voice
- The VOD track defaults to 2, which is your mic alone in this plan. Pick 6 as the VOD track and tick it on every source except music. If the option doesn't show up, check your Twitch account is connected under Settings, Stream.
- YouTube claimed your video even though you credited the song
- Credits don't stop Content ID. Mute track 4 in your editor and export again, or replace that section with music from the YouTube Audio Library. Copyright bots don't read descriptions, and they don't have a sense of humor either.
Test before you go live
- Your one minute test shows every sound on its own line in the editor.
- Muting the music track doesn't lower your voice or the game.
- No source has two of its own tracks ticked.
- If you stream on Twitch, you checked a test VOD and the music isn't there.
- Your background music is copyright-free, or you know you'll mute it when editing.
- Content ID has nothing left to grab.
Cómo Separar los Audios en OBS para Editar tu Gameplay sin Copyright en YouTube | 2026
Watch the full tutorial (in Spanish) ↗Common questions
Does this replace splitting audio per app?
No, the two work together. Per-app audio gives you a mixer bar for each sound so you can adjust volumes live. Tracks decide what stays separate in your recording. To set up the per-app sources, follow the guide on separating audio in OBS for game, Discord and mic.
Does this change what my live viewers hear?
No. The stream goes out on track 1, which has everything mixed as usual. Tracks 2 to 6 only change your recording and, if you turn it on, your Twitch VOD.
MKV or Hybrid MP4?
I use MKV with Premiere. For DaVinci Resolve or CapCut, Hybrid MP4 works better. If you're not sure, pick Hybrid MP4 and try a short recording before the long stream.
What happens if YouTube claims the music?
A Content ID claim affects the video and usually doesn't touch your channel. The owner can monetize it, block it or track its views. In YouTube Studio you can erase the claimed song or replace it with Audio Library music, and if that works, the claim is removed automatically.
Does Twitch mute music too?
Yes, Twitch can mute parts of a VOD or delete clips when it detects copyrighted audio. That's why it's worth keeping music off the VOD track with Twitch VOD Track.
Do I need a paid editor?
No. Premiere is paid, but DaVinci Resolve has a free version and so does CapCut, with paid extras. Any editor that shows multiple audio tracks will do.


