

Short answer
Before you start
- A free Canva account. Templates and elements with a crown need Canva Pro.
- OBS Studio with a goodbye scene
- The follower, subscriber and bits names you want to thank
- Optional: your webcam, if you want to appear next to the credits
Bring your setup to a 24/7 AI Streamer Coach
Ask Streamer Coach →Get personalized feedback to fix streaming issues and plan your next content.
Step by step
- 01
Make a 1920 by 1080 video in Canva
Nicole Rojas | YouTube | 1:04 ↗Stream's over, you're saying bye, and the screen is just your webcam while people drift away. A bit sad. Let's build movie-style credits that roll on their own while you chat. In Canva, go to Video and pick YouTube video, 1920 by 1080. Search Templates for credits and you'll find a bunch ready to go. I start with a black and white one, the classic Hollywood look.
What you should see: A horizontal video canvas opens and the left panel lists credits templates.
- 02
Type your headings and your community's names
Nicole Rojas | YouTube | 1:32 ↗Delete what you don't need from the template and keep the text centered. Add three headings: Followers, Subscribers and Bits leaderboard. Make the headings bigger than the names (I bump them to 31) so they read as titles. Under each one, type the names you want. You don't have to list everyone. Put Thanks for this stream at the top and See you next time at the end.
What you should see: The canvas shows three centered headings, names under each one, and your goodbye line at the bottom.
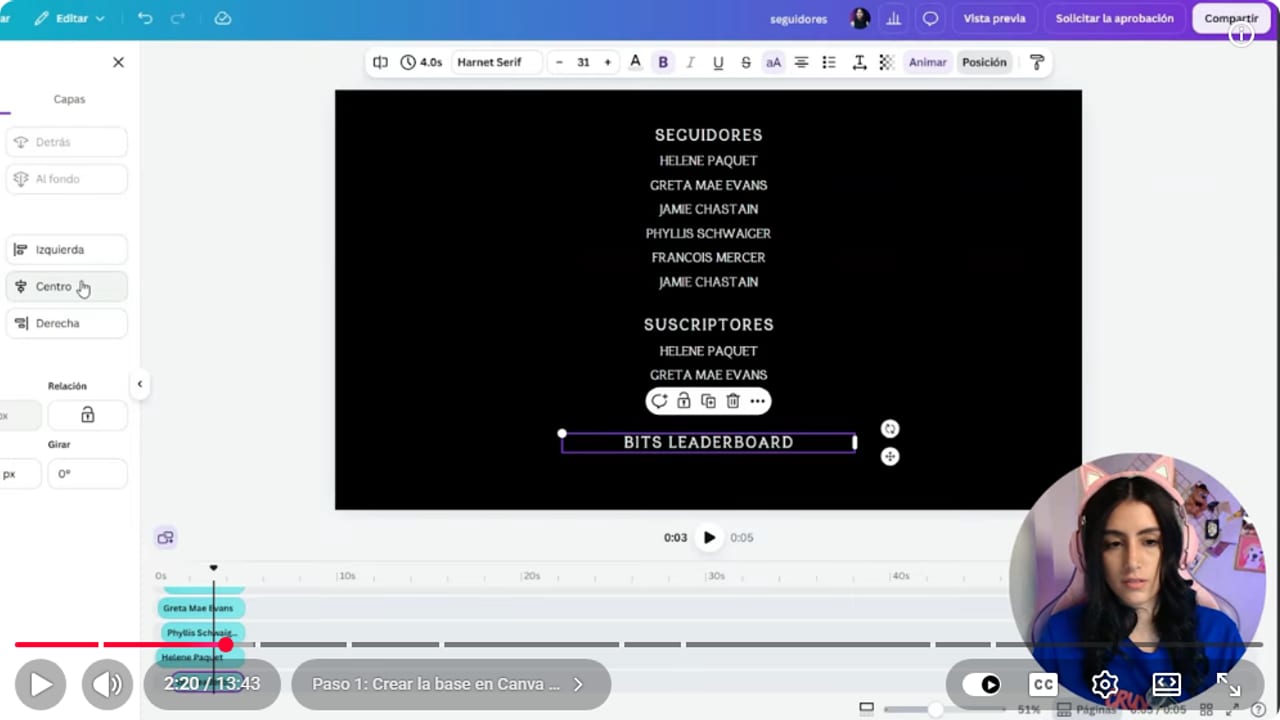
Notice the headings are bigger than the names, so they read as section titles. YouTube · 2:21 ↗ - 03
Group everything and open Create an animation
Nicole Rojas | YouTube | 2:43 ↗Select all the text and click Group so it moves as one block. Drag the group down to the bottom of the canvas, almost off it, and zoom out to give yourself room. With the group selected, go to Animate and choose Create an animation. Canva shows a tip: hold Shift while you drag and the path comes out perfectly straight.
What you should see: The Create an animation panel opens on the left, with the tips and the Group and Element tabs.
- 04
Drag the credits up with Shift and pick Steady
Nicole Rojas | YouTube | 3:20 ↗Hold Shift, drag the group straight up until it leaves the top edge, and let go. That path is your animation. Under Motion styles pick Steady so the text doesn't wobble. Then lower the Speed. I keep it really slow so every name gets read.
What you should see: When you play the page, the credits travel straight up from the bottom and exit at the top.
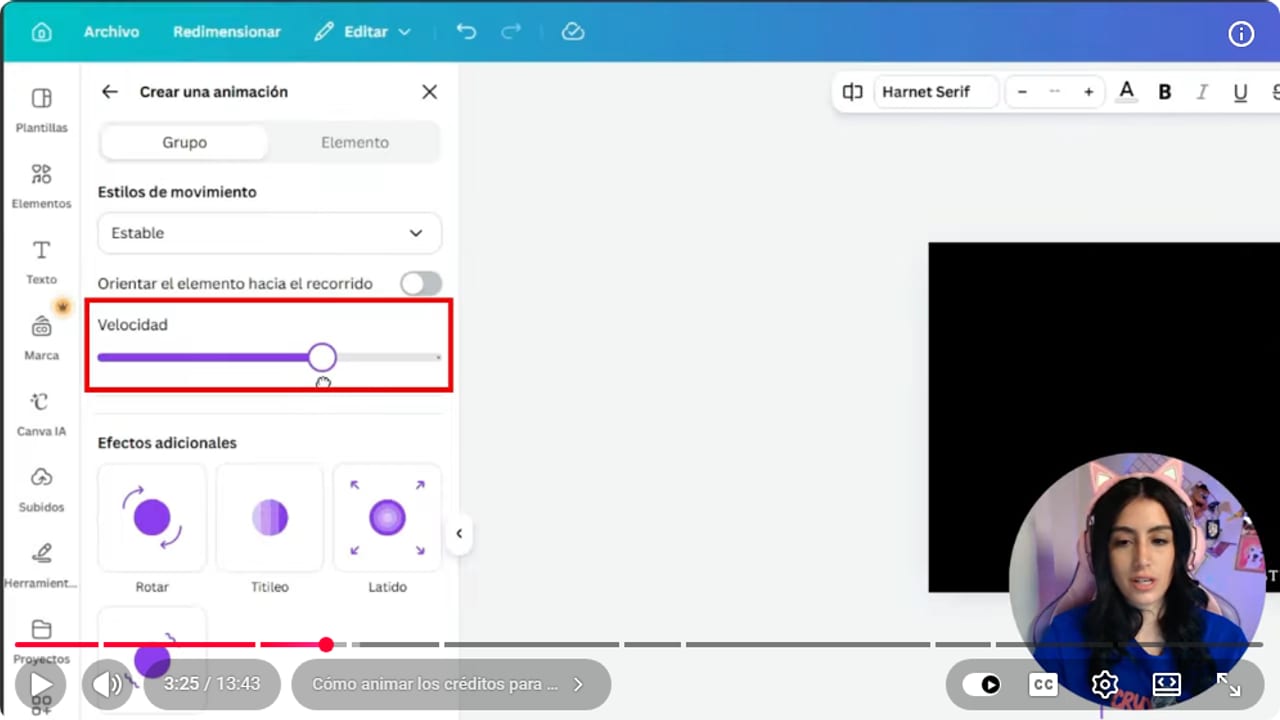
Pick Steady and drag Speed down until every name is readable. YouTube · 3:26 ↗ - 05
Optional: leave room for your camera and chat
Nicole Rojas | YouTube | 3:53 ↗If you don't want credits across the whole screen, slide the group to one side. On the other side, add a green rectangle that your webcam will cover in OBS, and leave space below for chat. You can also drop in your logo from Elements.
What you should see: The credits sit on one side and the green box for your camera sits on the other.
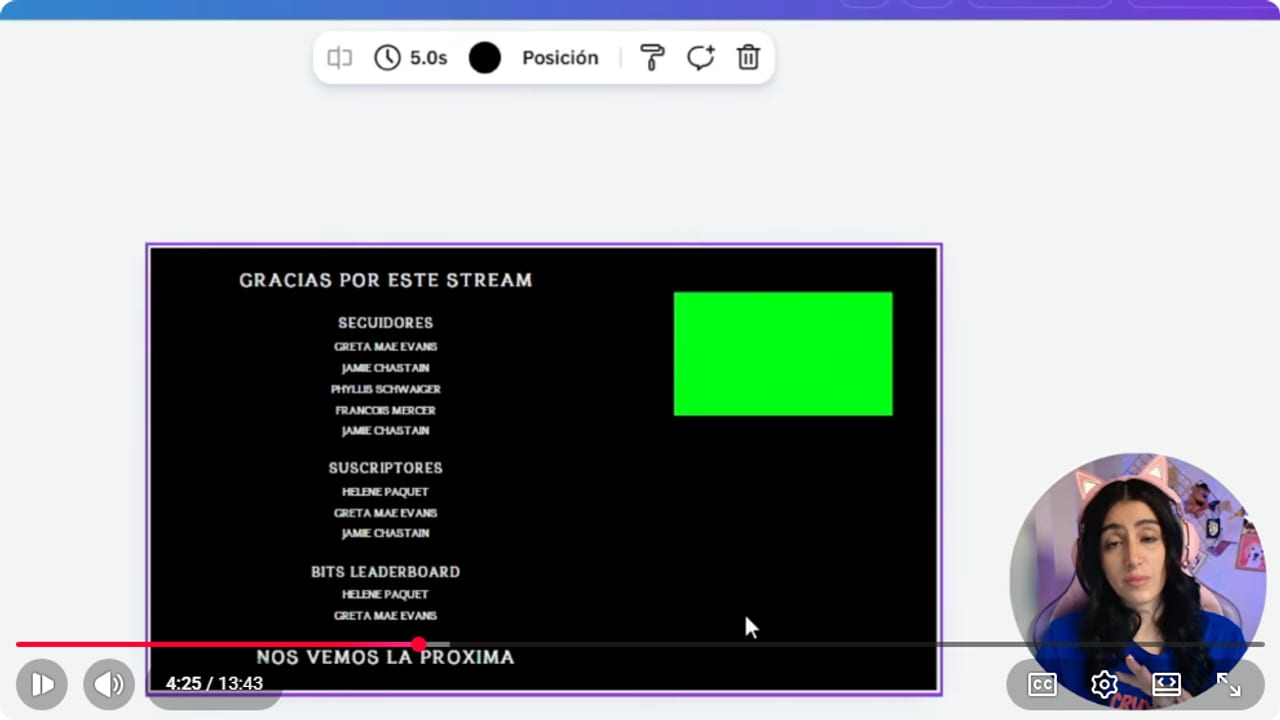
The green rectangle marks where your webcam goes when you build the scene in OBS. YouTube · 4:26 ↗ - 06
Build the cute pink version
Nicole Rojas | YouTube | 4:42 ↗For the second style, find another credits template. Heads up: the ones with a little crown are Canva Pro, so on the free plan they're just inspiration. I picked one with little flowers that already has animated bits falling down the sides, switched the background to a stronger pink and added the same headings. Throw in animated stickers if you like. Then repeat the animation: group, move down, Create an animation, drag up with Shift, Steady, slow speed.
What you should see: You have a second page with a pink background, the same headings and animated decorations on the sides.
- 07
Start the Halloween credits on a new page
Nicole Rojas | YouTube | 6:08 ↗For the third style, go to Pages and add a new one. Pick a Halloween background, or keep it black if that reads better. Choose a font with some attitude that people can still read. I tried a few script fonts and kept one that's legible. Type your headings and names. My trick: leave some empty space above and below the text block, so the animation doesn't fall apart. Group and animate the same way as before.
What you should see: The new page shows your Halloween headings on a dark background, and they roll up when you play it.
- 08
Add animated elements, a moon or a VHS texture
Nicole Rojas | YouTube | 8:42 ↗Go to Elements, search Halloween and set the filter to Animated. You'll get little ghosts, pumpkins and bats for the sides. Videos has backgrounds too, like a moon (crowned ones are paid, and Pixabay has more options). Another idea: lay a VHS texture over everything and drop its opacity so it sits in the background.
What you should see: The credits roll with ghosts or bats moving at the sides and a moving background behind them.
- 09
Download it as an MP4 at 1080p
Nicole Rojas | YouTube | 10:03 ↗When the version is finished, go to Share, then Download. Leave File type on MP4 video and set Quality to 1080p. Under Select pages, pick the page you want, or All if you want all three styles. Click Download.
What you should see: Canva renders the video and the MP4 with your credits lands in your downloads folder.
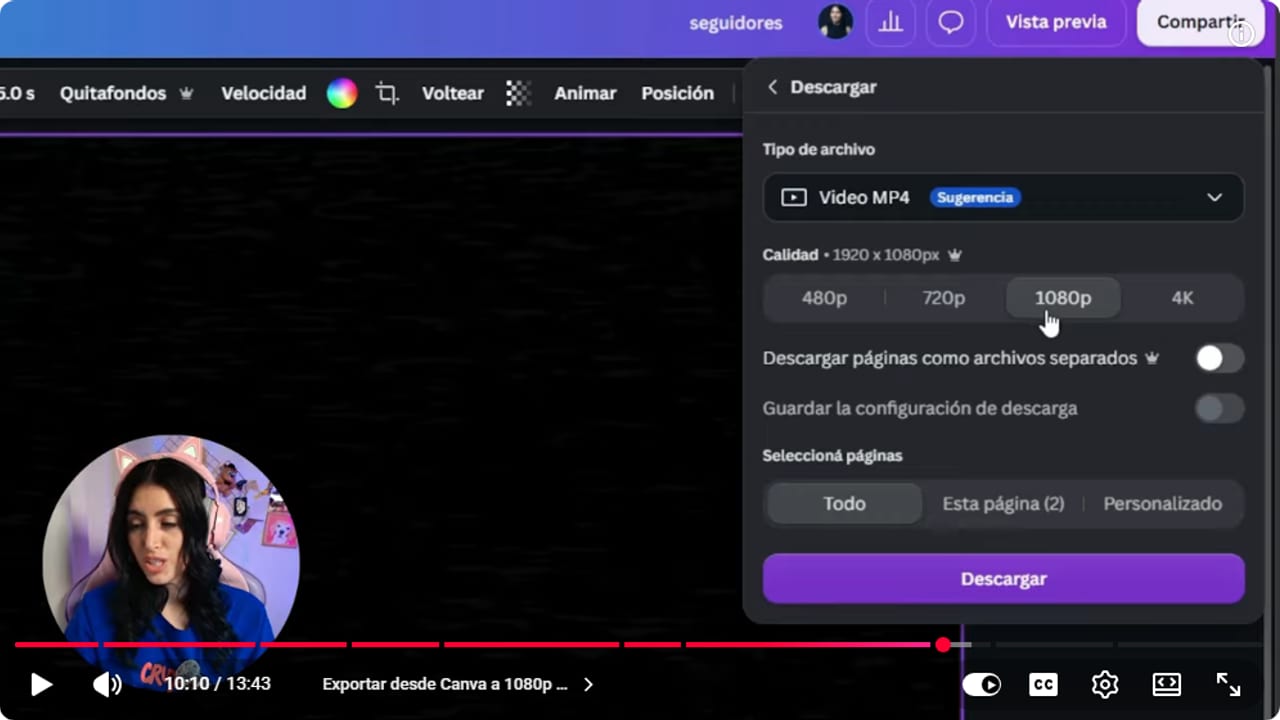
Keep MP4 video, choose 1080p and check which pages you're downloading before you click Download. YouTube · 10:11 ↗ - 10
Name each file and keep it in a fixed folder
Nicole Rojas | YouTube | 10:20 ↗Give each video a name that tells you what it is, like cute credits or VHS credits, so you can switch styles per stream. Save them in Downloads or another folder on your PC, never on a USB stick or external drive. If OBS can't find the file when it starts, it throws an error every single time.
What you should see: Your folder shows the credits files with clear names, all on your PC's own drive.
- 11
Add it to OBS as a looping media source
Nicole Rojas | YouTube | 10:48 ↗In OBS, go to your goodbye scene. If you had a See you soon image there, hide it with the eye icon. Click +, choose Media Source, name it something like Halloween credits overlay and click OK. Use Browse to pick the file, turn on Loop so it keeps rolling while you talk, and if it came out too fast, lower the Speed (I set it to 75%). Click OK.
What you should see: The preview of your goodbye scene shows the credits rolling, and they start again when they reach the end.
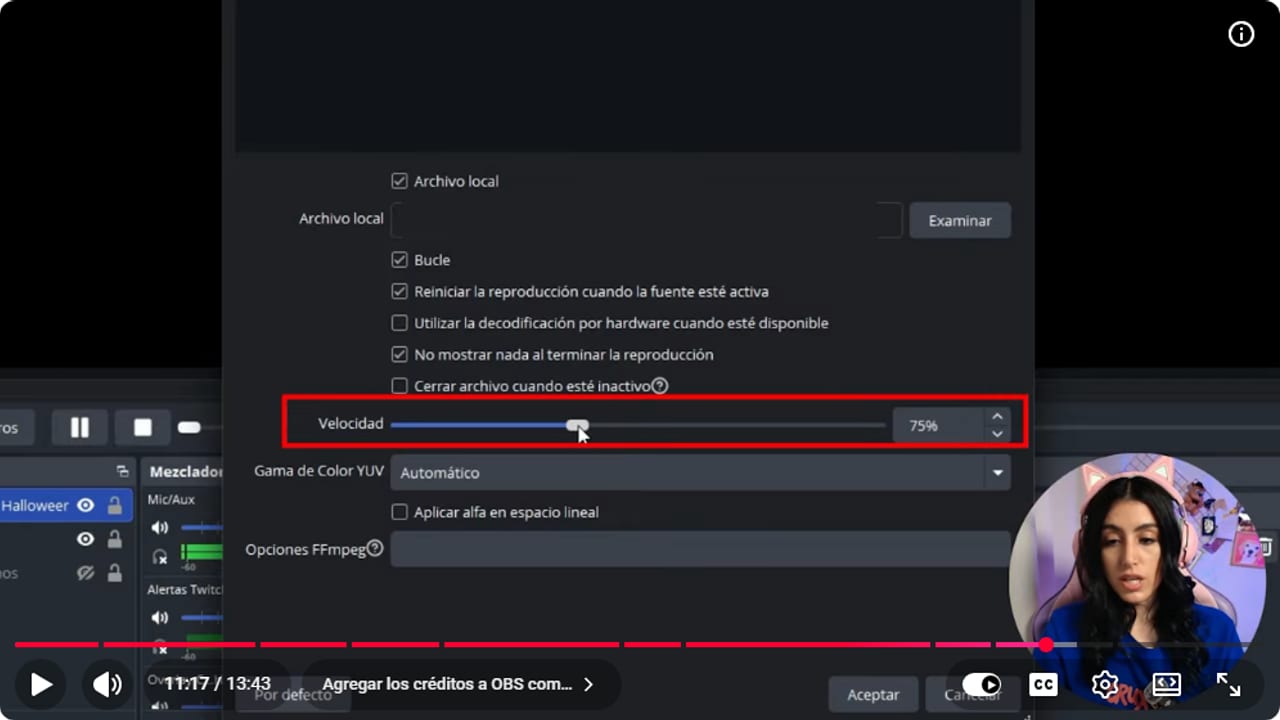
With Loop checked the credits restart on their own, and Speed slows them down if they came out fast. YouTube · 11:18 ↗ - 12
Add your webcam and say bye over the credits
Nicole Rojas | YouTube | 11:25 ↗If you left the green space, click +, add Video Capture Device, pick your webcam and place it on that side, above the credits in Sources. The credits keep looping while you chat, wave and tell everyone to come back next time. Before each stream, take 5 minutes to update the names in Canva and download again. And that's it: your stream ends like a movie.
What you should see: Your goodbye scene shows your camera on one side and the credits rolling next to it without stopping.
If something does not work
- OBS shows an error on launch because it can't find the video
- That happens when the file lives on a USB stick or external drive that wasn't plugged in. Move the video to a folder on your PC, like Downloads, and pick it again with Browse in the media source.
- The credits fly by too fast to read a single name
- Lower the Speed in Canva's Create an animation panel and download again. If you'd rather not re-export, open the media source in OBS and drag Speed down until the names are readable.
- The credits drift sideways or wobble on the way up
- Redo the path while holding Shift as you drag, so it comes out straight. Then pick Steady under Motion styles. Hiccuping credits aren't the farewell vibe you were going for.
- The animation falls apart or text gets cut off as it rolls
- Make sure you grouped everything before animating, or each text box goes its own way. Leave empty space above and below the block, like I did in the Halloween style, and start the path with the group well below the canvas.
- The credits play once and then the screen goes empty
- Open the media source in OBS and turn on Loop. The video restarts on its own while you keep chatting.
Test before you go live
- The names in the credits are from your latest stream, with no typos.
- The video is saved on your PC's drive, not on a USB stick.
- The credits source only lives in your goodbye scene.
- Your camera covers the green box without hiding any names.
- You played the whole scene and the credits restart without an ugly jump.
- And that's it: your sign-off has movie credits now.
Cómo Hacer Rolling Credits para tu Stream en Canva | 3 Estilos GRATIS 2026
Watch the full tutorial (in Spanish) ↗Common questions
Can I make end credits with free Canva?
Yes. I built all three styles with templates, elements and the animation tool on a free account. Only items marked with a crown need Canva Pro, and those are still handy for ideas.
Do the credits update with each stream's names automatically?
No. These credits are a fixed video, so before each stream you change the names in Canva and download again, which takes about 5 minutes. Making them fill in by themselves means wiring them up to Streamer.bot or Mix It Up, and that's a much bigger setup.
Can I be on camera while the credits roll?
Yes. Slide the credits to one side in Canva, leave a green rectangle on the other, and place your webcam over that spot in OBS. You can also save room at the bottom for chat.
What should go in the credits?
I use Followers, Subscribers and Bits leaderboard, plus Thanks for this stream at the top and See you next time at the end. You don't need everyone on there. Pick the people you want to thank, and chat gets something to talk about while they hunt for their name.
Can I animate other stream graphics in Canva?
Yes. The same animate-and-export-as-video approach works for a stinger transition you build in Canva and use in OBS. And when your channel needs something one of a kind, you can hire a motion graphics designer to make custom credits.


