

Short answer
Before you start
- An up-to-date OBS Studio
- A scene with your game, camera and audio
- A wired connection if you can manage it
- Ten minutes for a test nobody sees
- Optional: a Twitch account and TwitchTest to pick a server
Bring your setup to a 24/7 AI Streamer Coach
Ask Streamer Coach →Get personalized feedback to fix streaming issues and plan your next content.
Step by step
- 01
Duplicate your profile before touching anything
Official OBS Profiles documentation ↗Blurry picture, lag, pixelated game. We've all been there, and the urge is to change ten things at once. Guide tip, not from the video: before you do, go to Profile, Duplicate, and call the copy Test.
Profiles store your output, video and connection settings. If something goes wrong, you switch back to the one that worked without rebuilding a single scene.
What you should see: The Profile menu lists two profiles, your original and Test, and your scenes look exactly the same.
- 02
Turn on bandwidth test mode
Nicole, bandwidth test ↗Open Settings, Stream. If you stream to Twitch, make sure Enable Enhanced Broadcasting is unticked. Further down, under advanced options, tick Enable Bandwidth Test Mode and click Apply.
Now click Start Streaming. OBS warns you it's in test mode, and you click Yes. It's a fake live: OBS sends the signal, but your channel stays offline. Open the game, camera and alerts like a real stream so the test carries the same load.
What you should see: OBS shows the bandwidth test warning, and after you accept, the button reads Stop Streaming while your channel stays offline.
- 03
Open Stats and watch three numbers
Nicole, OBS Stats ↗With the test running, open the View menu at the top and pick Stats. Most of what shows up you can ignore. Three rows matter:
Frames missed due to rendering lag: that's your GPU. Skipped frames due to encoding lag: that's your CPU. Dropped frames (network): that's your internet. Watch which one climbs while you play. That number tells you what to fix, no guessing for three years.
What you should see: The Stats window opens with all three rows visible, and one of them keeps adding frames while you play.
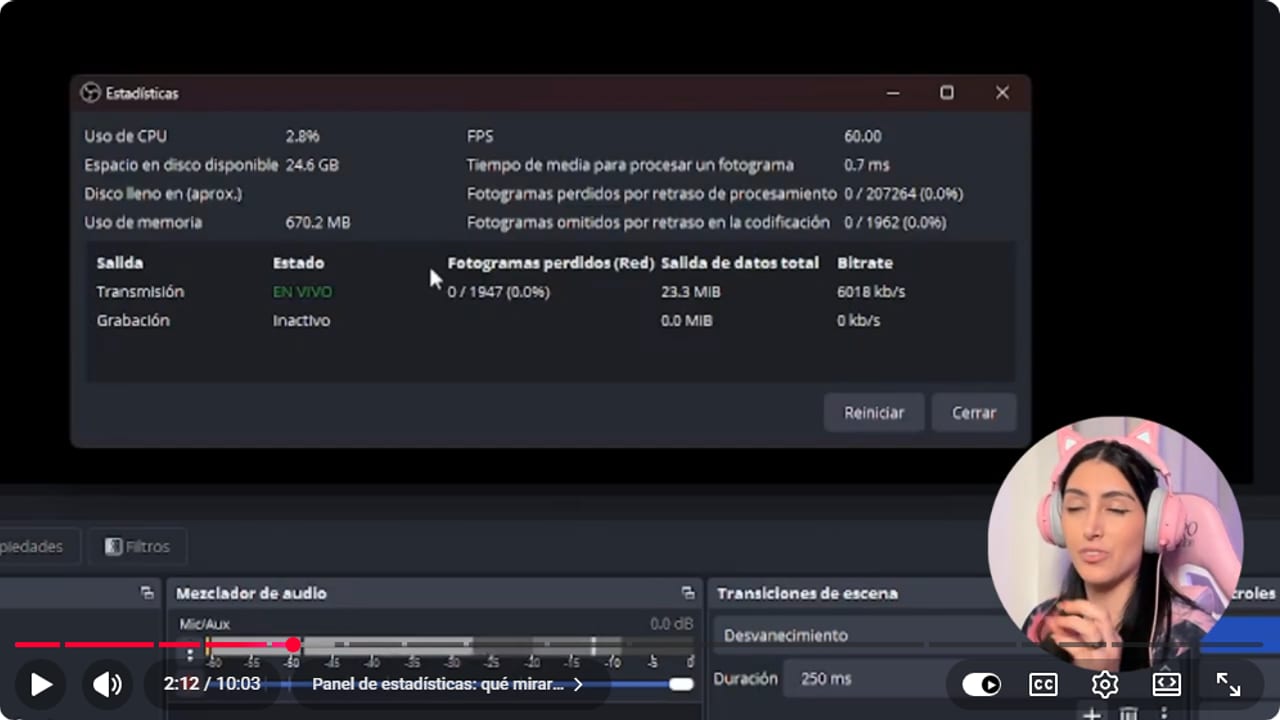
Stats separates network dropped frames, rendering lag, and encoding lag during the test. YouTube · 2:13 ↗ - 04
Network drops: fix your internet and turn off Dynamic Bitrate
Nicole, network loss ↗Start with the advice everyone gets: restart your modem. Then plug your computer in with a cable instead of Wi-Fi. Run a speed test on Speedtest and write down your upload speed. You'll need it in step 6.
Then go to Settings, Advanced, Network, and untick the option that dynamically changes bitrate to manage congestion. It's in beta and often doesn't work well, so you're better off without it.
What you should see: In Settings, Advanced, Network, the dynamic bitrate box is unticked, and the network dropped frames in Stats stop climbing.
- 05
Rendering lag: go easy on the GPU and lower resolution
Nicole, GPU load ↗This one is your GPU. Go into the game's settings and lower the graphics quality. Close anything else using it, like Chrome or WhatsApp, and keep only OBS, the game and whatever you need to stream.
If that's not enough, open Settings, Video. Leave the base resolution at 1920x1080 and drop the output to 1280x720. For the downscale filter, pick Lanczos, which looks best. If your computer is still struggling, switch to Bicubic. Keep FPS at 60, the standard.
What you should see: Settings, Video shows an output of 1280x720 with your chosen filter, while the base canvas stays at 1920x1080.
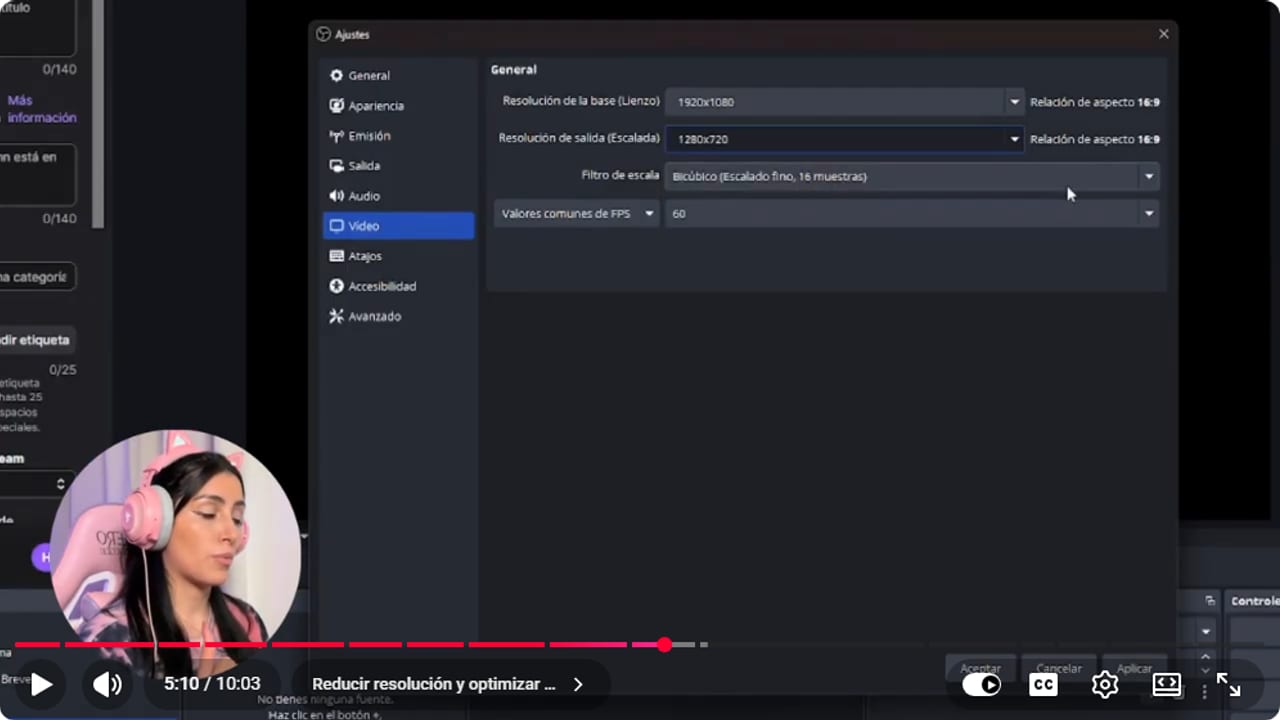
Output is scaled to 1280 by 720 with a bicubic filter while the base canvas remains 1920 by 1080. YouTube · 5:10 ↗ - 06
Set bitrate, encoder and preset under Output
Nicole, encoder choice ↗Open Settings, Output, and start in Simple mode so you understand each option before going Advanced. On Twitch, Nicole says video bitrate tops out at 6000 kbps. Twitch lists 6000 as the recommended bitrate for 1080p60 (4500 for 720p60) and doesn't call it a maximum. Bitrate depends on your upload speed. I have plenty of headroom and still leave mine at 6000. In the video Nicole sets audio bitrate to 320. Today Twitch recommends 96 kbps and lists 160 kbps (AAC) as the maximum, so for Twitch don't go above 160.
Under Encoder, an Nvidia card gives you NVENC (hardware). The software option, x264, puts all the work on your CPU, so if encoding lag was your problem, use hardware. For the preset, I use Medium. Slower means better quality, and if your computer starts to choke, step it down.
What you should see: Simple output mode shows your bitrate, the hardware encoder and the preset you picked, ready to compare in Stats.
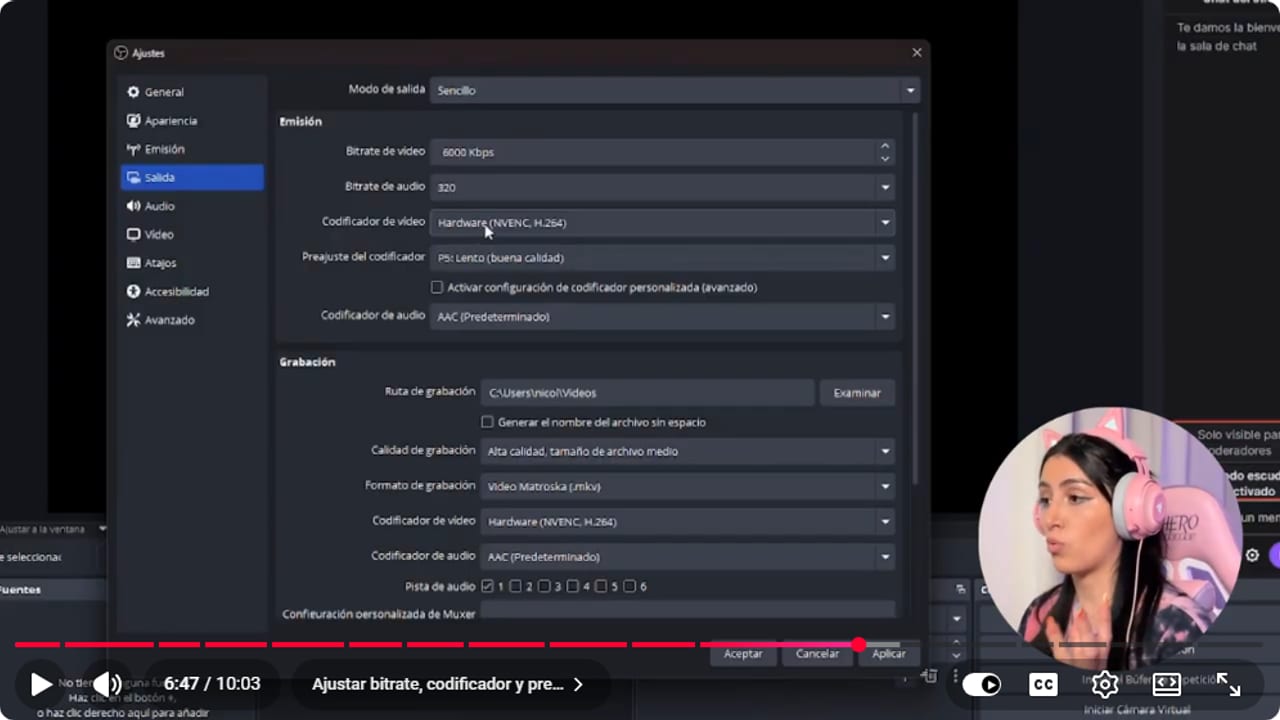
Simple output mode shows the bitrate, encoder, and preset for comparison during the test. YouTube · 6:48 ↗ - 07
Switch to Advanced and pick the encoder for your hardware
Nicole Rojas | YouTube | 5:43 ↗Once Simple mode makes sense, go to Settings, Output, and set Output Mode to Advanced. Stay on the Streaming tab. The Video Encoder list only shows what your computer supports.
NVIDIA NVENC H.264 is for Nvidia cards. It encodes on the GPU and leaves your CPU alone. It's the one I use, and on an RTX 20 series or newer the quality is excellent. Apple VT H.264 is for Macs with an M1, M2, M3 or M4 chip. x264 runs on your processor. The picture is good and you don't need a graphics card, but a weak CPU will lag. Short version: Nvidia, use NVENC. Mac, use Apple VT. No dedicated GPU, use x264.
What you should see: The Video Encoder dropdown opens and lists NVIDIA NVENC H.264, Apple VT H.264 or x264, depending on your machine.
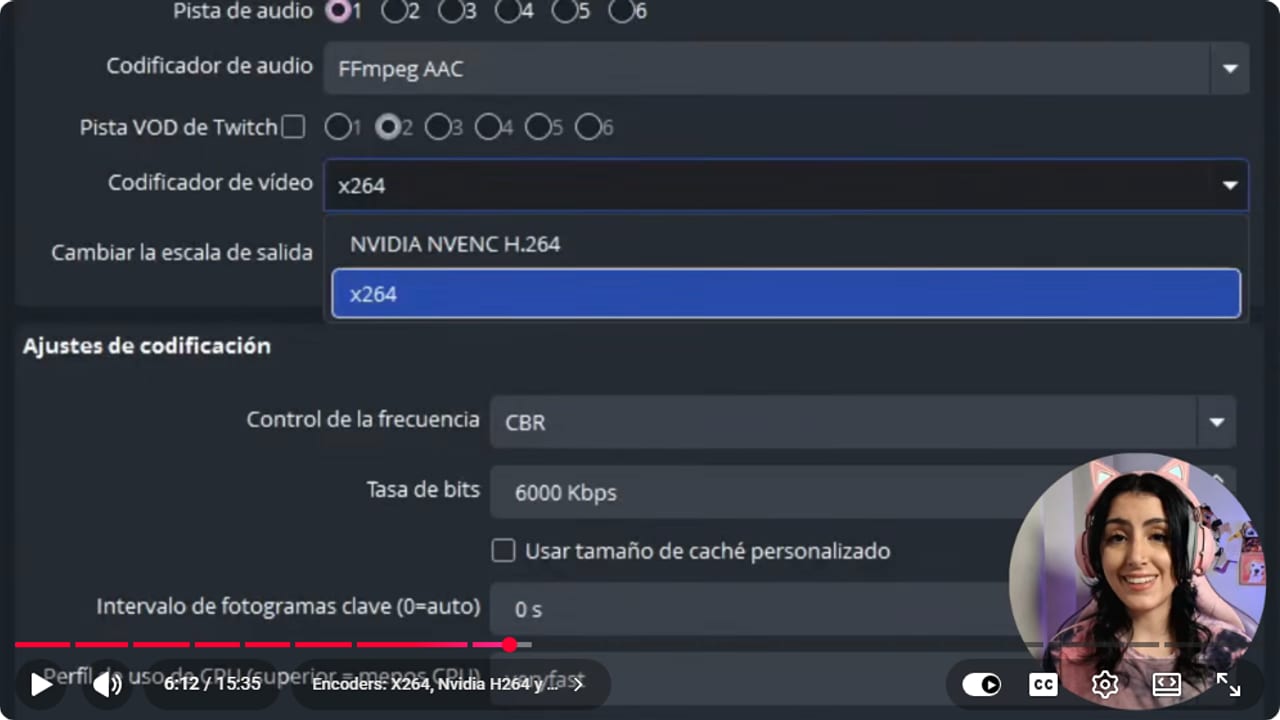
If NVIDIA NVENC H.264 shows up, you have an Nvidia card and should use it. If only x264 appears, you're encoding on the CPU. YouTube · 6:13 ↗ - 08
Set your platform's bitrate and a 2 s keyframe interval
Nicole Rojas | YouTube | 7:44 ↗On the same tab, under encoder settings, leave Rate Control on constant bitrate (CBR). It keeps the bitrate even, and platforms handle it better (Nicole explains it at 10:09, and Twitch's broadcasting guidelines also suggest CBR). For Bitrate, if you only stream to Twitch, enter 6000 kbps. Nicole calls it Twitch's limit, and Twitch recommends it for 1080p60 (4500 for 720p60). Going past it gets you nothing and works your computer harder. YouTube has no such recommendation, and there I'd go with 10000 if your computer and internet can take it.
Before you raise it, check the upload speed you wrote down from Speedtest. If it falls short, start lower and work up gradually while watching Stats. Set Keyframe Interval to 2 s, the standard for both Twitch and YouTube.
What you should see: Encoder settings show constant bitrate, your number under Bitrate, and 2 s under Keyframe Interval.
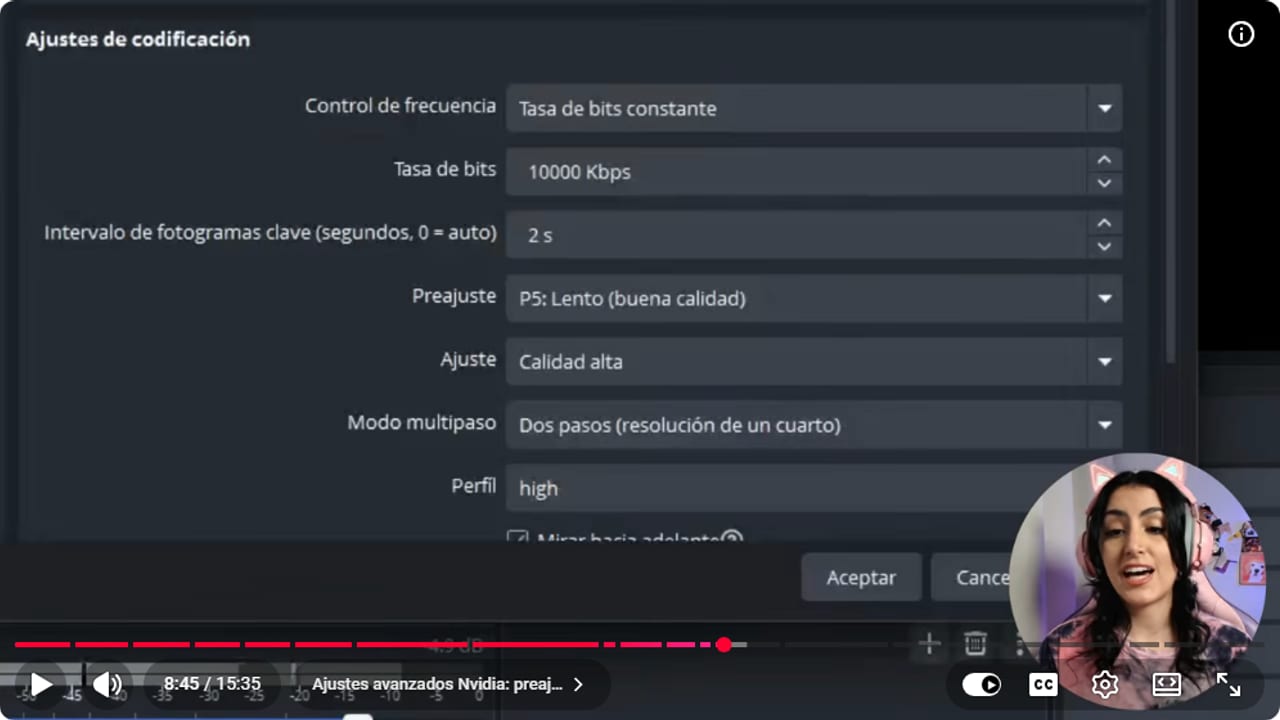
This is the YouTube setup: 10000 kbps and a 2 s keyframe interval. For Twitch, same layout with 6000. YouTube · 8:46 ↗ - 09
On NVENC: preset P5 or P6, two passes, high profile
Nicole Rojas | YouTube | 8:42 ↗If you picked NVENC, the Preset decides how hard your GPU works on encoding. It runs from P1, the fastest and lowest quality, up to P7. Go with P5 or P6, the sweet spot. Save P7 for strong GPUs, an RTX 4070 or better.
For Multipass Mode, choose Two Passes (Full Resolution) if your GPU supports it. Set Profile to high. If you see Look-ahead and Adaptive Quantization, tick both, since they improve quality. Set B-Frames to 2 and leave the custom encoder options field empty.
What you should see: Preset reads P5 or P6, Multipass Mode reads Two Passes (Full Resolution), Profile reads high, and B-Frames shows 2.
- 10
On x264: CBR, veryfast or fast, high profile
Nicole Rojas | YouTube | 10:09 ↗If you're on x264, leave Rate Control on CBR under encoder settings. Next is CPU Usage Preset (higher = less CPU). Ultrafast uses the least and placebo uses a ton. I'd pick veryfast or fast. If your CPU is very powerful and you aren't lagging, you can go down to medium, but don't go below medium unless your CPU is a beast.
Set Profile to high and Tune to none. Click Apply and run another test with Stats open.
What you should see: CPU Usage Preset shows veryfast or fast, and during the test CPU usage in Stats stays under 80%.
- 11
Compare two tests, not two memories
Nicole Rojas | YouTube | 2:02 (where to find Stats) ↗Guide tip, not from the video: Change one thing at a time. Run the same scene for the same length of time, once with the old setting and once with the new one, and screenshot Stats at the start and end of each.
Keep a change only if it lowers the number that was climbing without causing a new problem.
What you should see: You have two Stats screenshots of the same scene, one per setting, to put side by side.
- 12
Save a rescue profile
Official OBS Profiles documentation ↗Guide tip, not from the video: Once you find a stable setup, rename that profile with the resolution and the date. Export it from Profile, Import/Export, and note the encoder, bitrate, resolution and FPS.
If an OBS or driver update changes performance, go back to this baseline before you start digging.
What you should see: The Profile menu shows your stable profile under its new name, and the exported folder is on your computer.
- 13
Still failing? Try another server with TwitchTest
Nicole, Twitch Test ↗If the stream still looks bad after all that, maybe you're not the problem. Maybe it's the server. Download TwitchTest, install it and paste your stream key at the top, like Nicole does. Careful: that key is private, so never show it on screen or share it. TwitchTest isn't Twitch software, it's a third-party tool by its author, r1ch. Download it only from the official page (r1ch.net/projects/twitchtest), never from a link someone sends you. If you're unsure, skip it. If you already pasted your key and have doubts, reset it in Twitch's Creator Dashboard. An official alternative is Twitch Inspector, which checks your stream without handing your key to a third party.
TwitchTest measures each server. Pick the one with the best Bandwidth, Quality and RTT, which sit at the top of the list. Then in OBS, go to Settings, Stream, Server, and choose the one with the same name. Mine is Dallas. Apply, OK.
What you should see: In Settings, Stream, the Server field shows the name you picked in TwitchTest instead of Auto.
- 14
Turn off test mode and go live
Nicole, returning to the live server ↗With everything tuned, go to Settings, Stream, and untick Enable Bandwidth Test Mode. Forget this and you'll be streaming to an audience of one: you, inside OBS.
And that's it. If your stream still looks like it was filmed on a calculator, don't get frustrated. Tuning a setup takes time and trial and error, but now you know where to look.
What you should see: Start Streaming no longer shows the test warning, and your channel shows as live on Twitch.
If something does not work
- Stats keeps adding network dropped frames
- It's your internet, not your computer. Restart the modem, switch to a cable and untick dynamic bitrate in Settings, Advanced, Network. If it keeps happening, lower the bitrate under Output until the number stops climbing.
- Rendering lag climbs and the game looks choppy
- Your GPU can't keep up. Lower the game's graphics, close Chrome and anything you're not using, and try a 1280x720 output with the Bicubic filter.
- Encoding lag climbs
- Your CPU can't keep up. Switch to a hardware encoder like NVENC, or pick a faster preset. Run the same scene again to compare.
- You talked for a while and nobody was watching
- Bandwidth test mode was still on. Untick it in Settings, Stream, and start streaming again. Happens to the best of us.
- Stats look clean but the stream still cuts out
- It could be the ingest server. Run TwitchTest (only from its author's page, r1ch.net/projects/twitchtest, and never share your key) and pick the server with the best Bandwidth, Quality and RTT in OBS instead of leaving it on Auto.
- One number improves and another gets worse
- Undo the last change and test again. If rendering and encoding are fighting each other, lower the output resolution first. Keep your Stats screenshots so you compare the same scene.
- NVENC isn't in the Video Encoder list
- OBS only shows NVENC when you have an Nvidia card. Without a dedicated GPU, use x264 on veryfast or fast. On a Mac with an M1, M2, M3 or M4 chip, look for Apple VT H.264 in the same list.
- On x264, CPU usage in Stats goes over 80%
- Your processor can't keep up with that preset. Move to a faster one, say from fast to veryfast, and close Chrome, Discord or Spotify if you don't need them. If you have an Nvidia card, switch to NVENC and test again.
Test before you go live
- You have a test profile and a stable one, kept apart.
- None of the three Stats rows grows during a ten-minute test.
- Enhanced Broadcasting and dynamic bitrate are both off.
- Your bitrate sits below what your upload allows and doesn't exceed the 6000 kbps Twitch recommends for 1080p60.
- Bandwidth test mode is unticked before you go live.
- Your stream key isn't visible in any scene.
- Your encoder matches your hardware: NVENC with Nvidia, Apple VT on a Mac, x264 without a dedicated GPU.
- The keyframe interval is set to 2 s.
Los mejores settings para tu stream según tu computadora
Watch the full tutorial (in Spanish) ↗Common questions
Is there one perfect setting for every PC?
No. The same resolution can fail because of your internet, your GPU or your CPU. OBS Stats tells you which one, and that tells you what to change.
Why turn off Dynamic Bitrate?
It changes your bitrate on its own when the network gets congested, say someone on your Wi-Fi starts watching Netflix. It's in beta and often doesn't work well, so you're better off turning it off and setting the bitrate yourself.
NVENC or x264?
It depends on your computer. With an Nvidia card, NVENC uses the GPU and leaves your CPU free. On an Apple silicon Mac, use Apple VT H.264. x264 is for when you have no dedicated GPU but a strong CPU, and AMD cards also have a hardware option (AMF), which Nicole mentions in the video without being sure of the name. If Stats shows encoding lag, switch to the hardware encoder and compare with the same scene.
Can I do this in Streamlabs?
Yes, Streamlabs has a Performance window, but it shows less information. For diagnosing problems, OBS gives you the three counters separately, which makes it much easier to tell what's failing.
Should I use a VOD track because of music?
In Advanced output mode you can set a separate VOD track so the saved video isn't muted when copyrighted music plays. If you later upload it to YouTube, it gets muted anyway. Royalty-free music, or games with a streamer mode that swaps in safe music, is the simpler fix.
30 or 60 FPS?
30 FPS works for lighter games or just chatting with your viewers. 60 FPS is for fast games like shooters, sports or fighting games, and it takes more resources. If your computer can handle it, go with 60. It's the standard on Twitch and YouTube, and you won't have to keep switching.
What bitrate should I use on YouTube?
YouTube doesn't have Twitch's 6000 kbps recommendation, so you can go higher. I recommend 10000 kbps, as long as your upload speed and your computer can keep up. If Stats starts counting network dropped frames, bring it down.
How do I back up my scenes in case I reinstall OBS?
Besides your profile, export your scene collection from Scene Collection, Export, and keep it in a folder or on an external drive. If you reinstall or stream from another computer, import it and everything's already in place. Future you will be grateful.


