
Short answer
Before you start
- A Twitch channel with an alert set already created in the Creator Dashboard
- Affiliate or Partner status, since Bits, subscriptions and badges are monetization features
- For badges: your artwork as a PNG with a transparent background
- Optional: your own GIF and sound for the big Bits alert
Bring your setup to a 24/7 AI Streamer Coach
Ask Streamer Coach →Get personalized feedback to fix streaming issues and plan your next content.
Step by step
- 01
Open text-to-speech on your sub alert
Nicole Rojas | YouTube | 3:46 ↗Out of the box, Twitch's voice only announces that someone subscribed. A bit robotic, honestly. Go to the Creator Dashboard, open Alerts and click Edit Alerts on your set. In the variants list, open Subscriptions and pick the one you use, for example the Prime sub variant. On the right, in that variant's settings, open the text and voice section.
What you should see: The text and voice section expands on the right, with the text-to-speech switches for that variant.
- 02
Turn on reading the viewer's own message
Nicole Rojas | YouTube | 4:06 ↗In the text-to-speech part there are two switches. One reads the alert text, the usual someone-just-subscribed-with-Prime line. The other reads the resub message, meaning what that person actually wrote. The second one is the trick, so turn it on. If you also want the message written on screen, switch on the option that shows the resub message. It works best on Bits, gifted subs and resubs.
What you should see: The resub message switch shows purple, and the alert text switch sits however you set it.
- 03
Pick the language, voice and volume
Nicole Rojas | YouTube | 4:22 ↗Set the language to the one your community speaks and pick a voice you like. I use a Latin American Spanish voice called Mía, because my stream is in Spanish. Put the volume somewhere between 50 and 100 (mine sits at 50) and leave the delay at 0. Hit the play button next to the volume to hear it, then save your changes with the button at the top right.
What you should see: Pressing play speaks in the voice you chose, and the variant's menus show your language and voice.
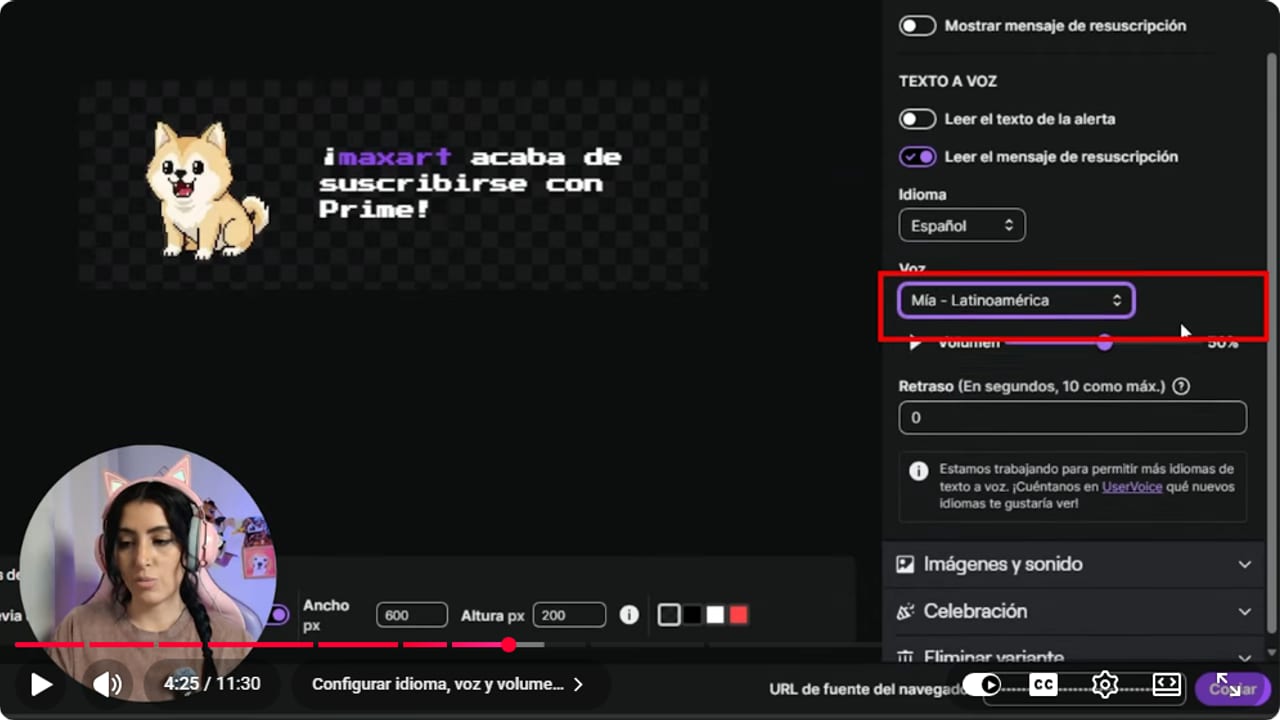
The switch that matters is the one reading the resub message. The alert text switch can stay off. YouTube · 4:26 ↗ - 04
Turn on AutoMod to filter what gets read aloud
Nicole Rojas | YouTube | 5:38 ↗Now anyone who cheers or subscribes can write a message, and the voice will read it to your whole stream. So you need a filter. In the Creator Dashboard, go to Moderation, Settings, and make sure chat verification is on. Further down is AutoMod. Switch it on if it's off and go through each category (aggression, bullying, disability and the rest), raising or lowering how much each one filters. If there are specific words you never want to hear, add them to the filter in that same section. If minors watch your stream, this step isn't optional.
What you should see: Under Moderation, Settings, every AutoMod category shows the filtering level you picked.
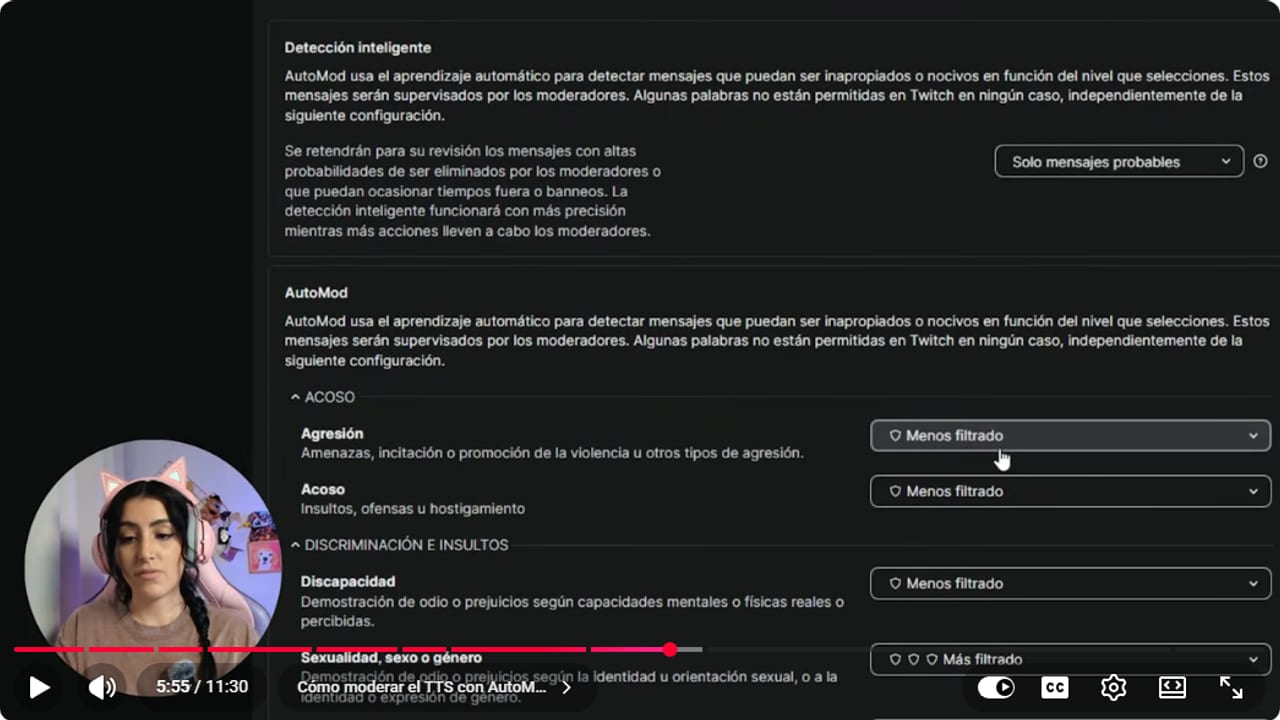
Each category has its own level. Raise the ones you never want the voice reading on stream. YouTube · 5:56 ↗ - 05
Create a variant for big Bits cheers
Nicole Rojas | YouTube | 1:20 ↗Trick number two: a 100 Bits cheer shouldn't look the same as a single Bit. Go back to Edit Alerts, open Bits and click New Variant. Give the variant a clear name, like 100 Bits cheer. You can leave the Bits function on any. Set the Alert Condition to Bits being at least a certain amount, and type 100 in the Bits field.
What you should see: The general settings show your variant name, the at-least condition and the number 100.
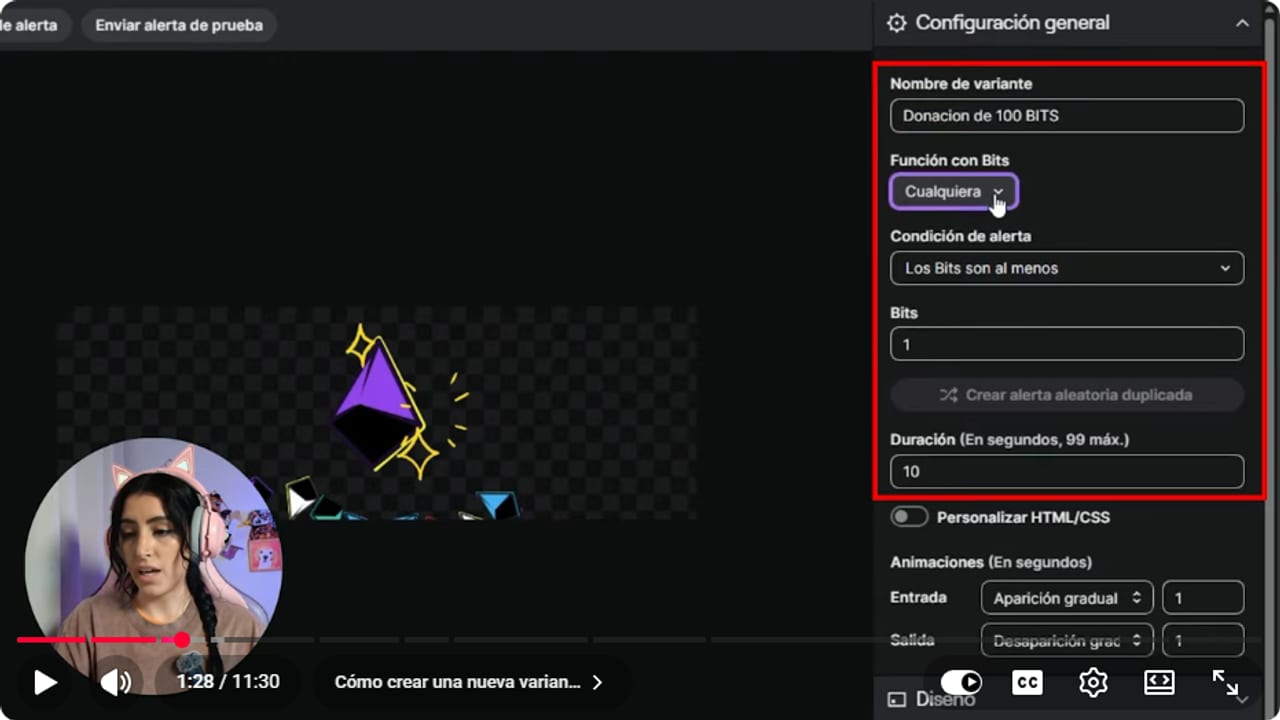
The Bits field still reads 1 here. Change it to 100 so the variant only fires on big cheers. YouTube · 1:29 ↗ - 06
Change the text and have it read the cheer message
Nicole Rojas | YouTube | 1:45 ↗Open the text and voice section for that variant and rewrite the line. Mine says the viewer just made history by cheering, with the Bits amount kept at the end. Turn on both the option that shows the Cheer message and the one that reads it, so the voice reads whatever the cheerer wrote. Set language, voice and volume the same way as in step 3.
What you should see: The preview shows your new line with a sample name and the number of Bits.
- 07
Choose the variant's image and sound
Nicole Rojas | YouTube | 2:02 ↗In the images and sound section, pick one from Twitch's image library or upload your own GIF (Giphy is a good place to look). If it comes out huge, lower the scale. I set mine to 44%. Below that, upload an alert sound or pick one from the sound library and set its volume. I keep it at 50%. Twitch scans uploads for copyrighted audio, so only use sounds you're allowed to use.
What you should see: The preview shows your GIF at the size you chose, and pressing play by the volume plays your sound.
- 08
Put the most specific variants on top
Nicole Rojas | YouTube | 2:45 ↗Almost nobody knows this one. Twitch checks your variants from top to bottom and fires the first one whose condition matches. If a catch-all variant sits at the top, like the default one that fires on at least 1 Bit or one for cheers of any amount, your 100 Bits alert will never show. Drag the specific ones up (500 above 100) and leave the catch-all ones at the bottom. Same goes for subscriptions by months and for gifted subs in packs of 5, 10 or whatever you like.
What you should see: In the Bits list, your 100 Bits variant is number one and the any-amount ones sit below it.
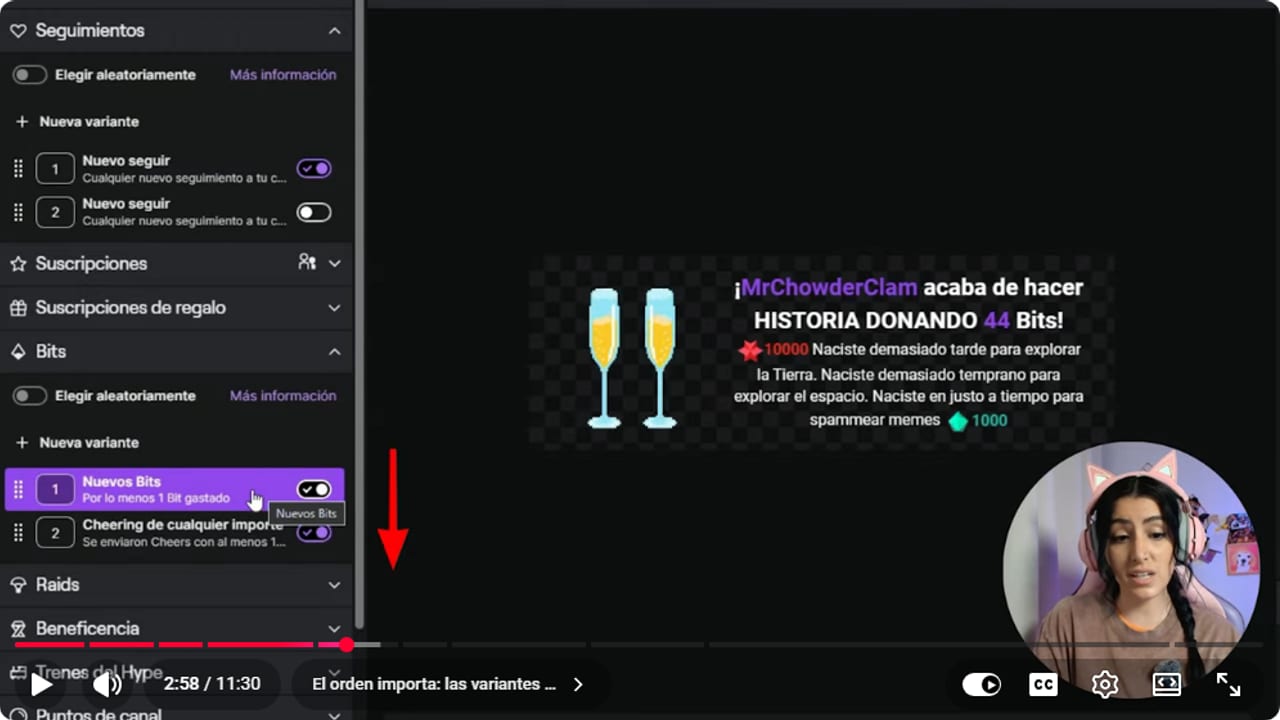
With this order the catch-all variant always wins. Drag your 100 Bits alert above both of them. YouTube · 2:59 ↗ - 09
Add a celebration to the Bits alert
Nicole Rojas | YouTube | 6:45 ↗Trick number three: the emote celebration. Inside your 100 Bits variant, open the celebration section and switch celebrations on. Choose an effect (fireworks, flamethrowers or rain), then the intensity and the area: just the video, the video and chat, or the whole screen. Save your changes.
What you should see: In the celebration section, the switch shows purple and the effect menu shows the one you picked.
- 10
Get your badges ready in three sizes
Nicole Rojas | YouTube | 8:08 ↗Badges are the tiny pictures next to people's names in chat, and they really are tiny. Your design has to read at 18 pixels and needs a transparent background. If there's no budget for an artist yet, you can start with AI-made images and remove the background, which is what I did with mine, even if they don't always look consistent. For the sizes, use a free resizer like EmoteResizer: upload your image and it gives you 72x72, 36x36 and 18x18. Watch out for ads on those sites, because some show Download buttons that aren't the tool.
What you should see: You have three transparent PNGs at 18x18, 36x36 and 72x72, and the drawing is still recognizable at the smallest size.
- 11
Upload your subscriber badges
Nicole Rojas | YouTube | 7:35 ↗Go to the Creator Dashboard, Monetization, Subscriptions, and open Subscriber Badges. At the top you'll see your current badges: the base one, 2 months, 3 months, 6 months and the slots you earn over time. In the section to manage badges, pick the one to change and upload an image into each box: 18 × 18, 36 × 36 and 72 × 72 pixels. Twitch's guide says each file must be a PNG with a transparent background and 25 KB or smaller.
What you should see: Your current badges show your artwork for the month you edited, replacing Twitch's default star.
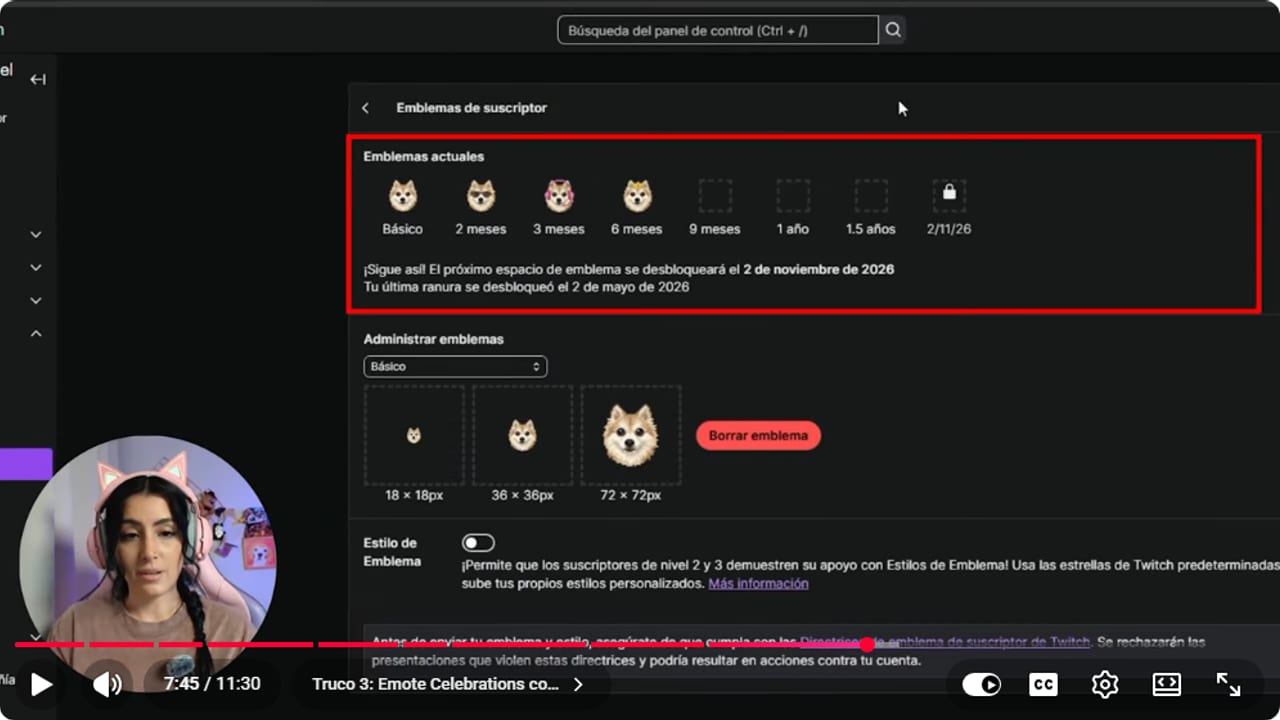
Each month needs all three sizes. Check the 18 pixel one, because that's how small chat sees it. YouTube · 7:46 ↗ - 12
Customize your Bits tier badges
Nicole Rojas | YouTube | 8:32 ↗For Bits badges, go to Monetization, open the Bits and Cheering settings, and scroll down to the Bits tier badges. You'll see Twitch's defaults: grey for 1 Bit, purple for 100, and so on. Click Edit on each tier and upload your three sizes. They don't need to match your sub badges, but they should feel like your channel, so supporters get spotted in chat straight away. And that's it: your alerts read your people's messages, big cheers get their own show, and your badges look like you. If your basic alerts aren't set up yet, start with the Twitch native alerts guide.
What you should see: In the Bits tier badges, each tier you edited shows your image instead of Twitch's design.
If something does not work
- The voice only says someone subscribed and skips their message
- The switch that reads the alert text is on, but the one that reads the resub message (or the Cheer message on Bits) is off. Turn it on in that variant's text and voice section and save. If the viewer didn't type anything, there's nothing to read.
- Someone cheered 100 Bits and the regular alert played
- A general variant sits above yours. Twitch uses the first match from the top, so drag your 100 Bits variant above the catch-all ones, then save your changes.
- The voice read out something you didn't want on stream
- The internet will internet. Raise the AutoMod category levels under Moderation, Settings, and add those words to the filter. If minors watch, think about leaving message reading off on the variants that don't need it.
- Twitch rejects your badge upload
- Check that you have three PNG files with transparent backgrounds, exactly 18x18, 36x36 and 72x72, each 25 KB or less. If the badges page isn't there at all, your channel isn't Affiliate or Partner yet.
- Your badge looks like a smudge in chat
- There's too much detail for 18 pixels. Simplify it to one face, one object or one strong color, with no text. Check it next to a name in chat before you redo every month.
Test before you go live
- You sent a test alert for every new variant from the editor.
- Bits and sub variants run from most specific to most general.
- The voice sits under your mic and game audio.
- AutoMod is on and the words you never want read aloud are in the filter.
- Your badges are recognizable in chat next to a name, at real size.
- And that's it: your chat now has a reason to set off alerts all stream long.
3 trucos avanzados para tus alertas de Twitch que casi nadie configura
Watch the full tutorial (in Spanish) ↗Common questions
Do these tricks cost anything?
No. Text-to-speech, variants, celebrations and badges all live in Twitch's dashboard for free. You do need Affiliate or Partner, because Bits and subscriptions come with monetization.
Does variant order matter for subscriptions too?
Yes, it works the same for subscriptions by months and gifted subs. Put the most specific conditions on top, like 6 months or 10 gifted subs, and the ones that accept any sub at the bottom.
Which text-to-speech voice should I use?
Pick one in your community's language so messages are easy to follow, and set the volume around 50. Test it with the play button before saving, so your first resub doesn't jumpscare you mid-game.
Do I need an artist for badges?
Not to get started. You can make them with AI, remove the background and swap them for commissioned art later. If you know an artist who's also just starting out, working together puts both of you in front of a new community.
Can I have different alerts for different Bits amounts?
Yes. Repeat the variant for 100, 200, 500 or any amount, each with its own image, sound and celebration. Just keep them ordered from biggest to smallest.


